CIE
Onboarding Process
It is necessary to follow the guidance in the Operations Manual available at this link Processo di Onboarding up to the point 4.2.2 - Autorizzazione alla federazione . These steps are for a public or private entity to apply to the Ministry of the Interior to join the “Enter with CIE” identification scheme. Once the Ministry of the Interior has approved the request, you can enter the technical data.
Creation of technical data
Precondition: The IP of the public domain MUST originate from Italy as the Ministry of the Interior restricts access to Italy only.
Before proceeding to enter the data within the portal following the guide 4.2.3 - Inserimento dei dati tecnici di federazione it is necessary to:
- Add a rewrite rule on the domain you want to protect with the “Enter with CIE” identification scheme;
- Generate the Entity Configuration (Federation Metadata), which is generated, automatically exposed and signed by the Oplon procedure.
Rewrite rule
To allow the domain to expose the Entity Configuration that will be generated, you must first apply the header rewrite rule called CIE-IDP-Simple to the domain you want to protect.
Identity provider parameters where n is a natural number other than zero:
- PRIVATE_KEY:
stringpem private key used for JWT; - CERTIFICATE:
stringsigned certificatestring; - ISSUER_n:
stringmust be set to:https://oidc.idserver.servizicie.interno.gov.itif the environment is PRODUCTION;https://preproduzione.oidc.idserver.servizicie.interno.gov.itif the environment is PRE-PRODUCTION;
- CLIENT_ID_n:
stringmust be set to an HTTPS URL that uniquely identifies the RP; - BUTTON_TEXT_n:
stringmust be set toContinue with CIE; - AUTHENTICATION_PROTOCOL_n:
stringmust be set toopenidfederation; - BUTTON_FILLED_n:
booleanmust be set totrue; - BUTTON_IMAGE_BASE64_n:
stringmust be set to the value of the CIE logo in base64.
To be compliant with log management , a digital certificate is required. Within the rewrite rule, fill in the following variables:
- LOG_CERT: path to the certificate (must be in p12 format);
- LOG_CERT_PWD: password of the certificate;
- LOG_CERT_ALIAS: alias of the certificate.
These 3 log variables are used for both CIE and SPID. Do not duplicate them on the same rewrite rule.
Entity Configuration Generation
Once the rewrite rule is applied, create the Entity Configuration.
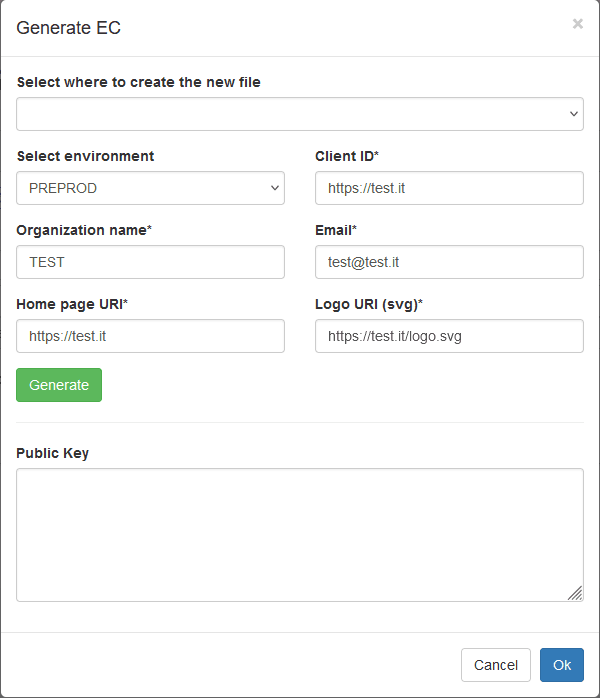
From the left menu go to Identity Link > CIE > CIE Generator. Click the + button and enter the following data:
- Select where to create the new file: select the node or cluster where you applied the CIE-IDP-Simple header rewrite rule;
- Select environment: there are two possibilities: PREPROD, the pre-production environment, or PROD, the production environment. The choice must then also be applied during technical data entry;
- Client ID: must be set to the HTTPS URL of the domain;
- Organization Name: value entered during onboarding in the Organization Name field;
- Email: same as organization name, in the PEC Email field;
- Home page URI: same value as Client ID;
- Logo URI: URI of the domain logo (logo format must be svg).
Once the data is entered, clicking the Generate button will generate the Entity Configuration, sign and expose it via the rewrite rule. In the Public Key field you will find the public key that must be entered in the technical data: save it.
Certificate Generation
To generate the certificate and keys, go to: Tools > Keys Generator. Fill in the following fields:
- Expiration days: validity duration of the certificate;
- CN: value entered during onboarding in the Organization Name field.
To generate them, click the “play” button in the upper-left corner. Copy and paste the PEM results into the PRIVATE_KEY and CERTIFICATE variables.
Enter technical data on the portal
It is time to enter the technical data in the CIE portal.
- Component ID: the value of the Client ID;
- Federation Public Key: newly saved public key;
- CIE button URL: URL of the “Enter with CIE” button +
/login.
If all the checks and configurations of the technical component are positive, the system performs federation in the specified environment and notifies the following recipients of the result:
- Administrative Contact
- Technical Contact
- Entity
At this point, you only need to confirm the federation. To do this, go back to the Identity Link > CIE > CIE Generator section of the ADC, select the entry to be federated and click the Federate button. If the process is successful, users will be able to access the service with “Enter with CIE”.
Entity Configuration Expiration
If the expiration date is exceeded, the “Enter with CIE” service will no longer be provided. To restore the service, go to the Identity Link > CIE > CIE Generator section, select the expired entry and click the blue Resign button to renew it.
Log Management
The information contained in the logs MUST be maintained and managed for a duration of not less than 24 months in full compliance with current national and European privacy regulations. To ensure confidentiality, data encryption mechanisms are adopted. Finally, the properties of integrity and non-repudiation are guaranteed in data storage.
The log files are located in: /TCOProject/bin/LBL/LBL_HOME/procsProfiles/<module>/federation_logs, where <module> is the module where the rewrite rule was applied, for example A10_LBLGoPlatform.
Below is the bash command to decrypt them:
# $encrypted_data replace with the file to be decrypted
# $cert replace with the certificate that encrypts the log (found in the rewrite rule)
# ${encrypted_data}.json replace with the name of the decrypted file
base64 -d "$encrypted_data" | openssl cms -decrypt -inform DER -recip "$cert" > "${encrypted_data}.json"
The deletion and management of logs is left to the system administrator.
CIE App
To authenticate, you need to download the app on your smartphone. From this link you can download both the production app and the pre-production one. To authenticate in the pre-production environment, you must use the test identity card (received by mail from the Ministry of the Interior after completing the onboarding process).