Oplon Secure Access User Guide
This guide is intended for all end users of Oplon Secure Access. It explains how to open a Host, RDP Remote App or Web App resource and how to make the best use of features such as Copy & Paste, the File Manager and the integrated text editor.
Browser compatibility (recommended)
Quick overview of tested and recommended browsers for use with OSA:
| Browser | Compatibility |
|---|---|
| 🟦 Google Chrome / Chromium / Microsoft Edge (Chromium) / Opera | ✅ Fully compatible: supports all features (File Manager, drag and drop, Shared Clipboard) |
| 🦊 Mozilla Firefox | ⚠️ Compatible with most features, but does not support the Shared Clipboard (reading the local clipboard): pasting with CTRL+V / CMD+V / SHIFT+INS works normally, while pasting from the right-click menu of the remote session requires the Graphic Clipboard. |
| 🧭 Safari and other browsers | ⚠️ Partial compatibility: some advanced features may not be supported. On Safari, as on Firefox, the Shared Clipboard is not available: pasting from the right-click menu of the remote session requires the Graphic Clipboard. |
Recommendation: for the best user experience we recommend using Google Chrome or a Chromium-based browser (✅). On Firefox and Safari, pasting with CTRL+V / CMD+V / SHIFT+INS works normally; to paste from the right-click menu of the remote session, use the Graphic Clipboard instead (see Copy & Paste).
First login and home screen
To access OSA, go to the address provided by your organization and log in with two-factor authentication. If this is your very first access, see the guide that explains step by step how to register and log in for the first time.
Once you log in, the dashboard immediately shows the screen of accessible resources.
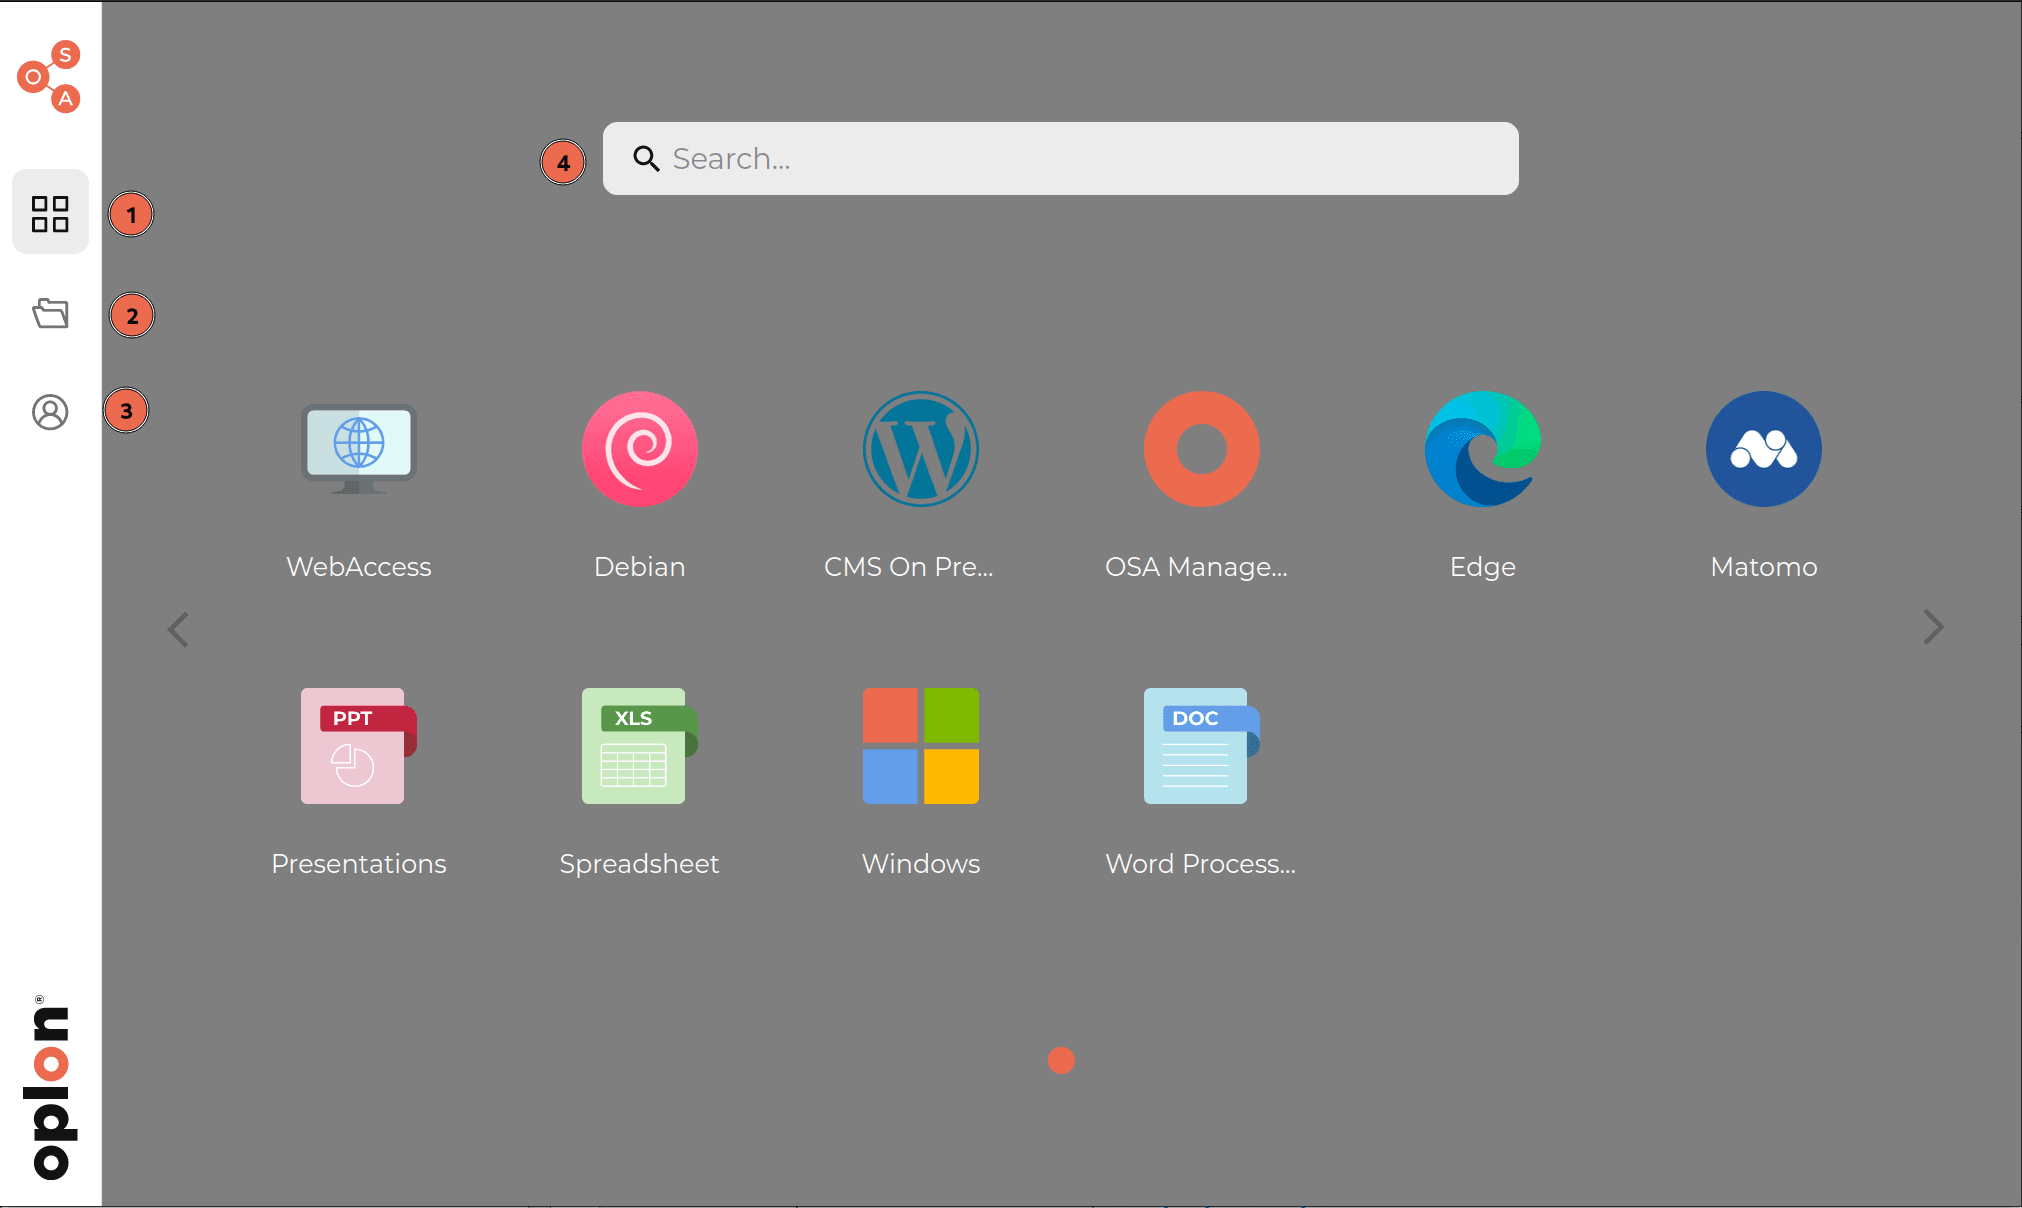
From here it is also possible to see:
Sidebar
The sidebar (on the left in landscape, at the bottom when the device is in portrait) contains, from top to bottom:
- Oplon logo: opens the About screen with version and licenses
- Inventory: opens the list of resources (list icon in tree view, grid icon in grid view)
- File Manager: opens the File Manager
- File Editor: opens the File Editor. A red dot means some files have unsaved changes
- Shared Folders and Trusted Connections: visible only if the administrator assigned you resources of these types (see Shared Folders and Trusted Connections)
- Download / Upload / Hypercopy: progress icons that appear only during file transfers
- at the bottom: Enter/Exit full screen, Reload page (only when OSA is installed as an app/PWA) and Settings
On the first access from a touch device, if full screen mode is not active, OSA suggests enabling it (“Enable fullscreen mode?”) for better performance.
Resources
In OSA a resource can be:
- Hosts:
- Linux/Windows with RDP/VNC/SSH
- Remote App RDP
- Web Apps (HTTP/HTTPS)
- Native
- Browser Isolation
Tree view and resource opening
The resources menu can also be accessed in tree mode. Once you have clicked the button dedicated to opening the Resources (1), the menu containing all the resources that can be accessed will be shown on the left.
To open a new resource, from the tree view (the grid view is very similar), simply click
- either the Open in a new tab (4) button (the only choice for Web Apps not in Browser Isolation)
- or Open here (5).
If there are multiple types of SSH/RDP/VNC access, the interface shows a submenu (6) where you select the protocol to use to access the resource. Likewise, if multiple OS login names are configured for that resource, the system also asks (7) which account to use for access.
If you open the resource with the Open here button, a screen (8) asks you in which of the 4 available layouts to place the new resource.
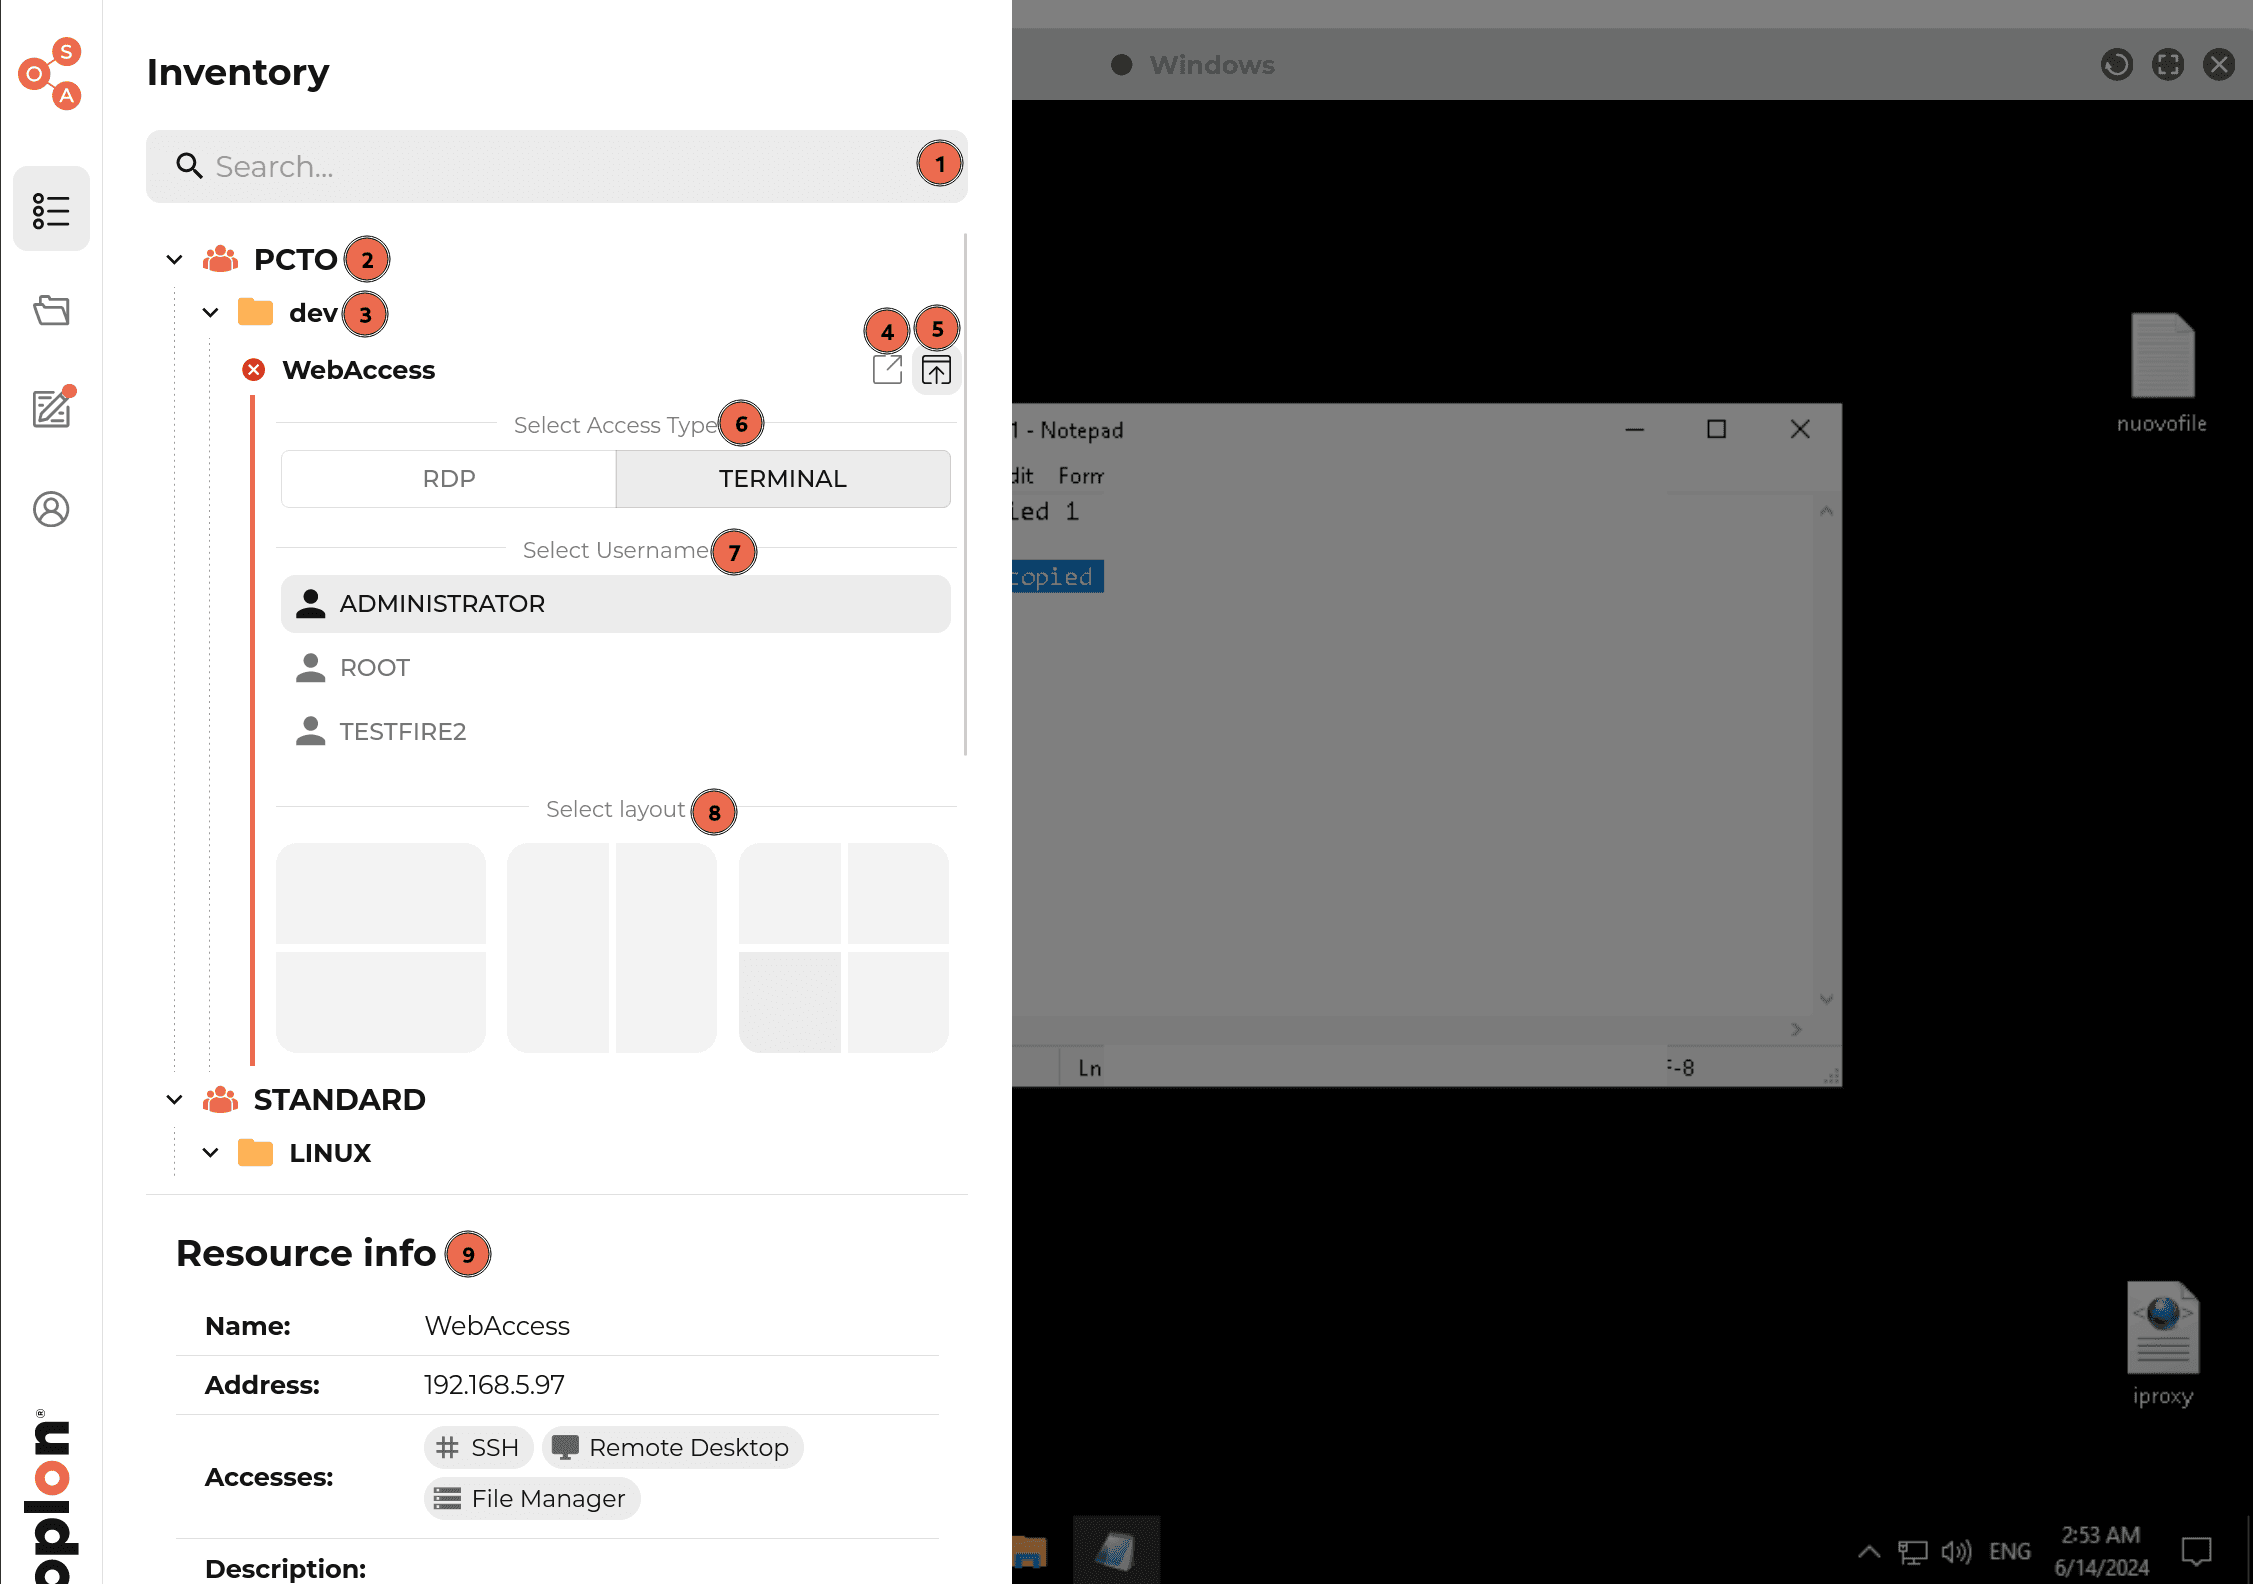
- Search bar: used to search resources by IP/hostname, name or description
- User group: it is the group of users (class of privileges) you access with, it is decided by the Manager and is used to assign a group of resources
- Location: it is a logical label that serves to group together a set of resources
- Open in a new tab: button used to open the resource in a new tab
- Open here: this is a button used to open the resource in the current layout
- Select Access Type: it is a list (if present) which contains all the types of access to the machine
- Select Username: it is a list (if present) that contains all the OS login names you can use to access the machine
- Select layout: lets you choose the arrangement:
- Full screen
- Two vertical windows
- Two horizontal windows
- Four windows
- Resource info: indicates the information of the currently selected resource
Notes on opening resources:
- the protocol, account and layout steps are skipped automatically when there is only one possible choice
- when choosing the account, an icon distinguishes local accounts, domain (Active Directory) accounts and, for SSH, accounts that log in with an SSH key
- while choosing, a red X replaces the status dot and lets you cancel the opening
- on screens narrower than 1200 pixels only one window can be open at a time: a single arrow replaces the two buttons and, if the layout is already taken, OSA offers to open the resource in a new tab (“Layout is full”)
- Web Apps always open in a new browser tab
The dot next to each resource in the tree view shows the state of its open sessions:
- gray: no session open
- green: at least one window of the resource is connected
- red: there are open windows but none is connected
Search, filters and favorites
The search bar (“Search…”) filters resources as you type, case-insensitively, looking for the text in all the fields of the resource (name, address, description, type…). The X clears the search.
The grid view also has filter chips: blue chips filter by User group, orange chips by Location. One filter is active at a time; the active filter appears as a chip inside the search bar and is removed with its X.
Resources are always sorted alphabetically. In the grid view Session Temporary Connections come first, then favorites, then everything else.
You can mark a resource as a favorite:
- in the tree view, with the star next to the name in the Resource Info panel; favorites are collected in the Favorites node at the top of the tree
- in the grid view, from the resource menu (right click or the ⋮ button) > Pin to favorites / Remove from favorites
In the grid view, clicking a resource opens it in the current layout; the resource menu (right click or ⋮) also offers Open in a new tab and Info.
Favorites, expanded tree nodes and view settings are stored in the browser: they are not synchronized to other devices or browsers.
Resource Info
Clicking a resource in the tree view (or Info in the grid view) opens the Resource Info panel, which shows:
- Name (with the favorites star)
- Address
- Description
- Accesses: the available protocols (SSH, RDP, VNC, App, Web App); the one in use is highlighted in green
- File Manager: the type of file access (File Manager via SFTP or Virtual Drive for RDP)
- Username: the accounts you can log in with. The X on an account clears the saved credentials for that account, which will be asked again at the next access
- Schedules: the time windows in which the resource can be accessed, if any (daily or within a date range), converted to your browser’s time zone
Opening through a direct link
A resource can be opened directly through a link containing the groupName, protocol and resourceId parameters
(plus optional parameters such as username). It is the same link OSA uses when you choose Open in a new tab,
so you can bookmark it in your browser to reach a resource quickly.
When a link of this kind is opened, the resource is shown full screen in a single-window layout. If the link is incomplete or not valid an error is shown; clicking OK takes you back to the homepage.
Session Temporary Connections
For enabled users, the + button is available in the tree view or in the grid view, depending on the settings. Clicking it shows the form to add a Session Temporary Connection, which then appears in the views and can be used as a normal resource. You can also edit or delete Session Temporary Connections by clicking the appropriate buttons. Each Session Temporary Connection is deleted when the session expires.

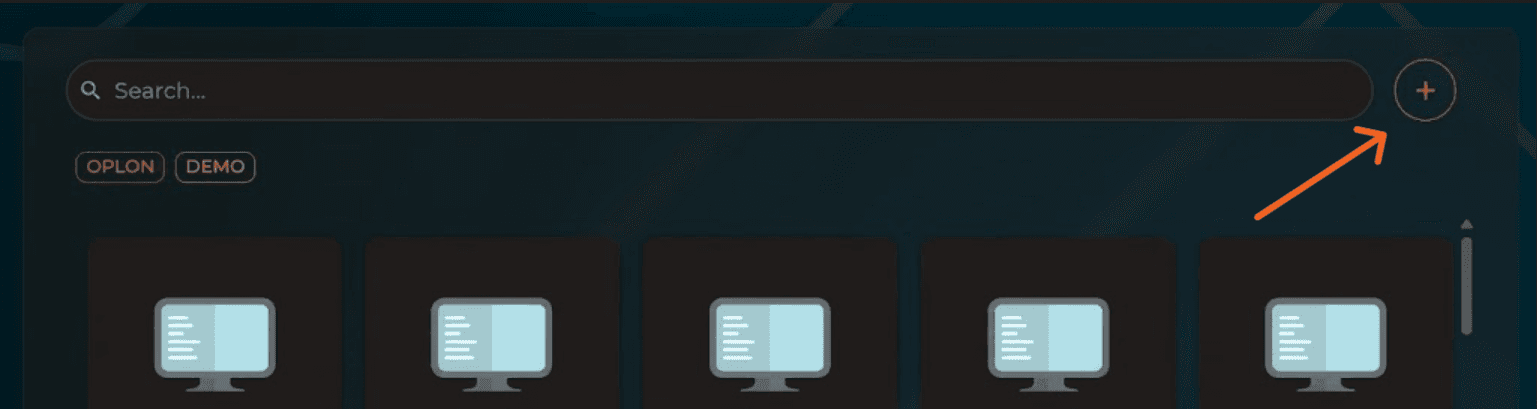
The Add Temporary Connection form asks for:
- Label: the name the connection will have in the views
- Host Name / ip address: a valid IP address or FQDN
- SSH / RDP / VNC: the protocols to enable, each with its port (defaults 22, 3389 and 5900). At least one protocol must be enabled
- Username and Password
Session Temporary Connections are marked with a clock icon. Deleting one is immediate, with no confirmation. They cannot be added to favorites.
Session access
When a resource is opened (and on every Refresh/Reconnect), depending on how the administrator configured the resource, you may be asked for:
- Credentials: if no complete credentials are saved for the chosen account, a form with Username (prefilled and locked if known to the server) and Password appears over the window. Click Log in to connect
- Session recording: if the session is recorded, the notice “The current session will be recorded.” appears. If the administrator made acceptance mandatory, the Registration Disclaimer window is shown: the Accept button is enabled only after reading the message to the end, while Deny closes the session
- Access Reason: if required, you must state the reason for the access (up to 1000 characters) before you can click Open. Cancel closes the session. On reconnection the field is prefilled with the last reason entered
Resource window
Once opened, the resource appears as a window within the OSA layout. Leaving aside the normal interactions with the resource, the interface features are listed below.
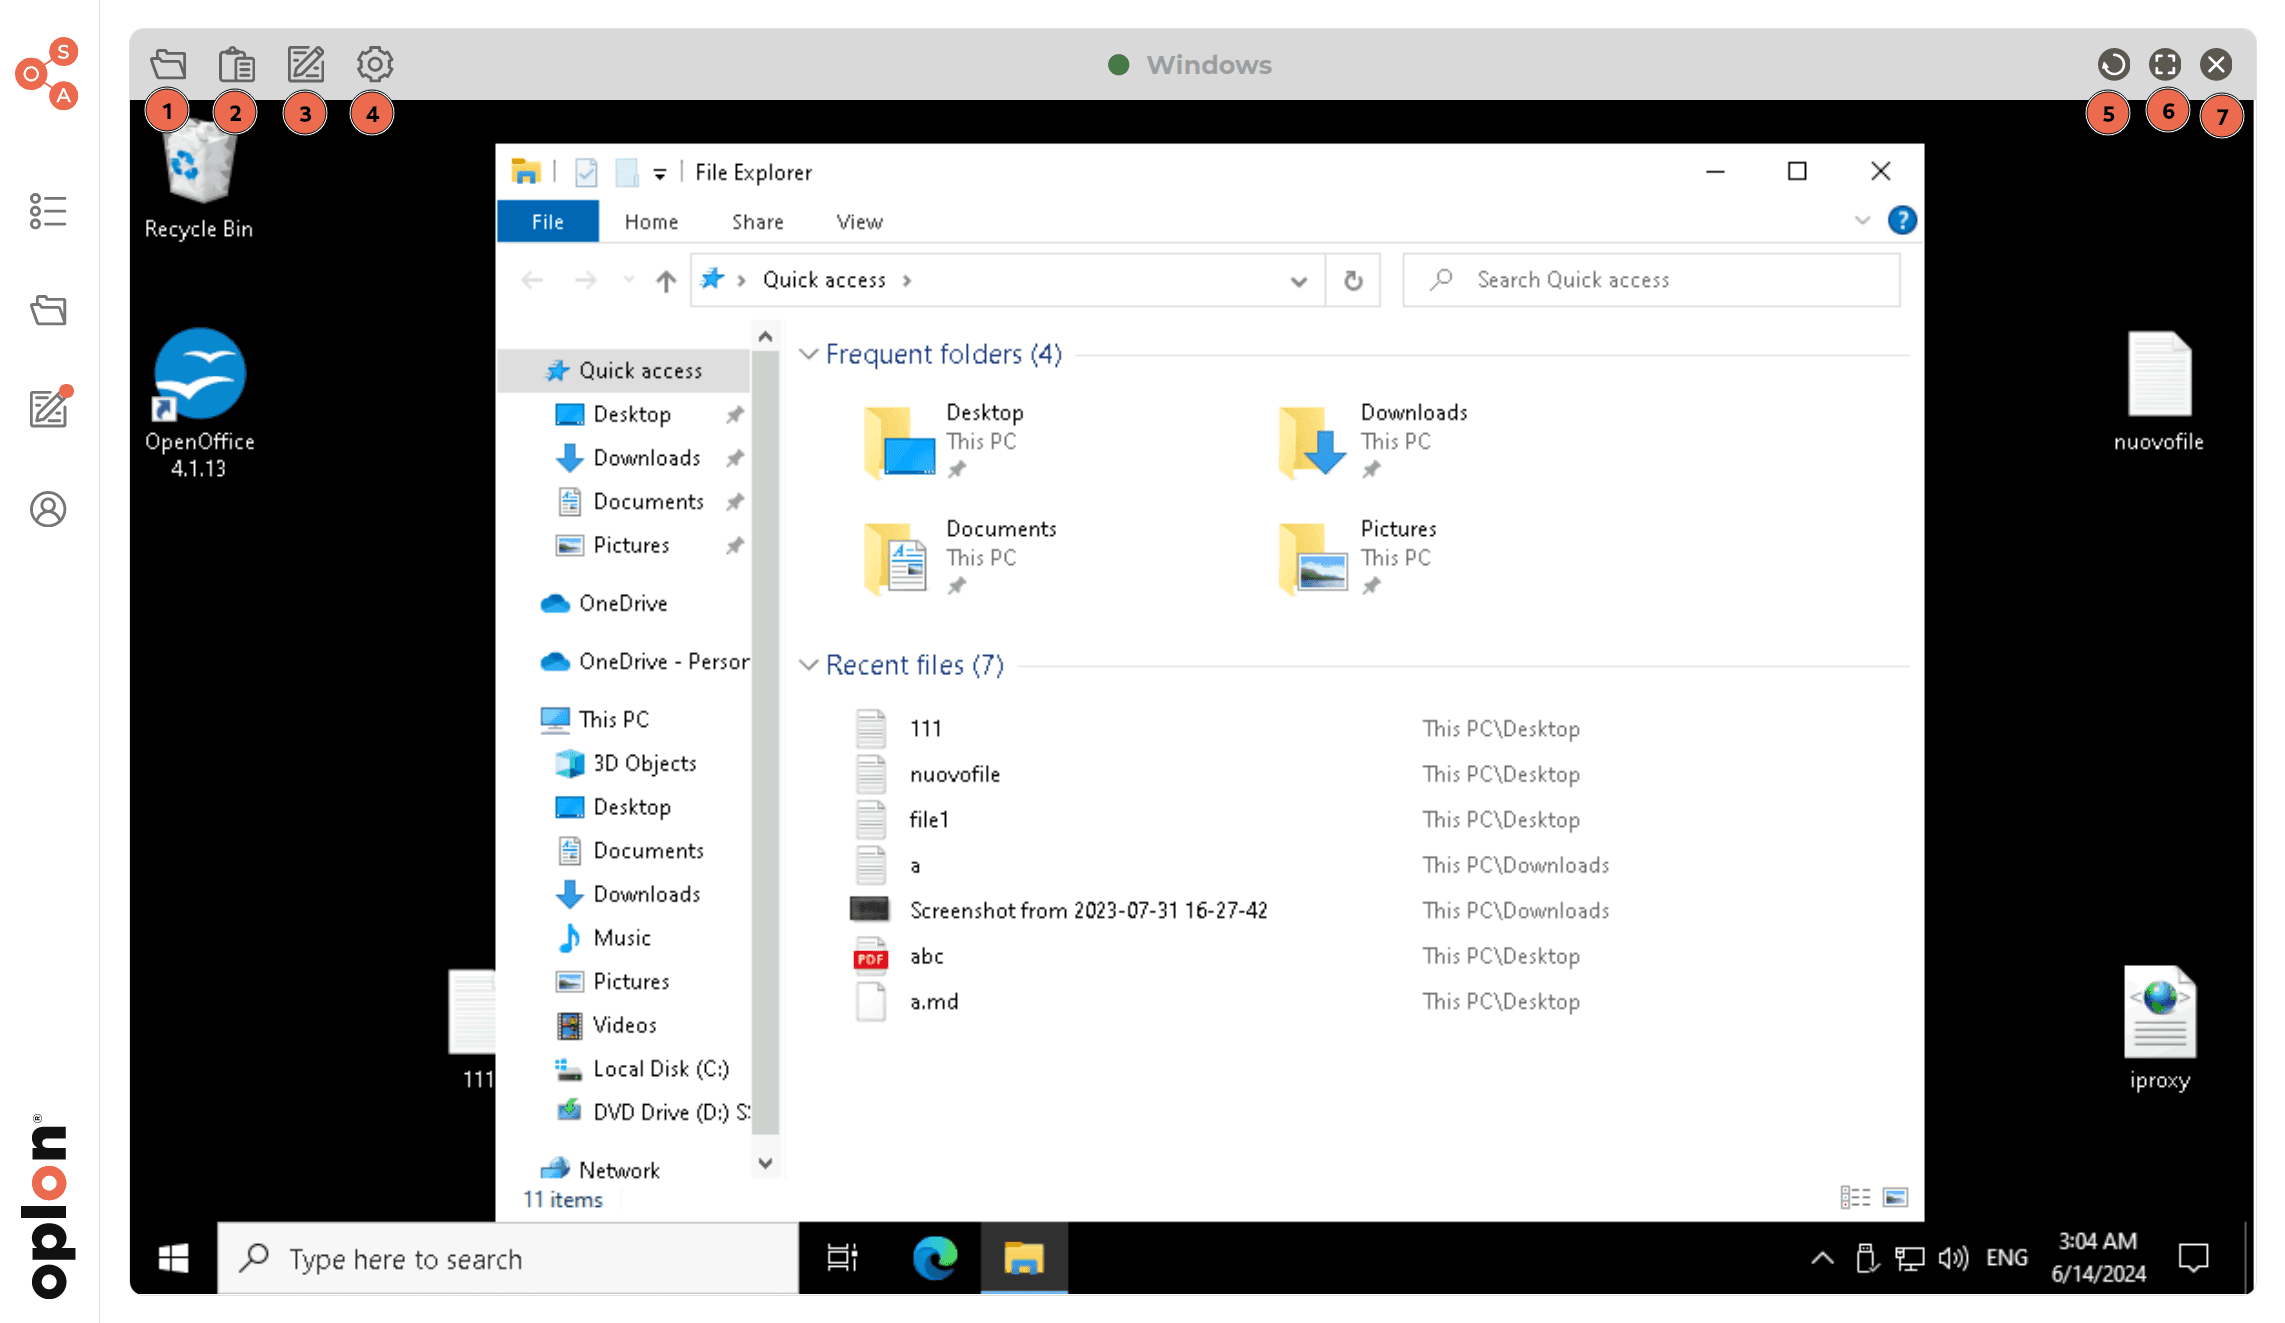
- File Manager
- Graphic Copy & Paste
- File Editor: the File Editor is available from the sidebar
- Settings: resource settings
- Refresh: used to reload the current session
- Fullscreen: used to occupy as much space as possible in the layout
- Close: used to close the resource
The buttons on the left of the window bar depend on the protocol:
| Button | Protocol | Description |
|---|---|---|
| File Manager | all | Opens the resource’s File Manager |
| Clipboard | all | Opens the Graphic Clipboard |
| Enable/Disable copy & paste | RDP/VNC | Turns clipboard sharing on or off on the fly |
| Virtual Printer | RDP/VNC | Appears only when there are print jobs in progress or completed (see Virtual printer) |
| Broadcast | SSH | Enables Broadcast Mode |
| Search | SSH | Opens the terminal search |
| Settings | all | Opens the window settings. A dot means a reconnection is needed to apply the changes |
| Keyboard | RDP/VNC | Opens or closes the on-screen keyboard |
On small screens these buttons are grouped under the ⋮ button.
Other window elements:
- Status dot next to the title: gray (idle), orange (connecting or reconnecting), green (connected), red (disconnected)
- Title: clicking it opens a card with the time the window was opened, the resource information and the New tab / Open here buttons to open another instance of the same resource
- Refresh and Close ask for confirmation if the session is connected (closing loses the current session). For Browser Isolation resources the Refresh dialog also offers Reload, which fully reloads the session
- if the connection drops, the window is blurred and the Disconnected message appears with the Reconnect button
File Manager
The File Manager of each Host is accessible through the folder-shaped icon located in the upper left corner of each open resource, or from the File Manager icon in the sidebar. By clicking on it, the File Manager of the selected machine will be shown in the side panel.
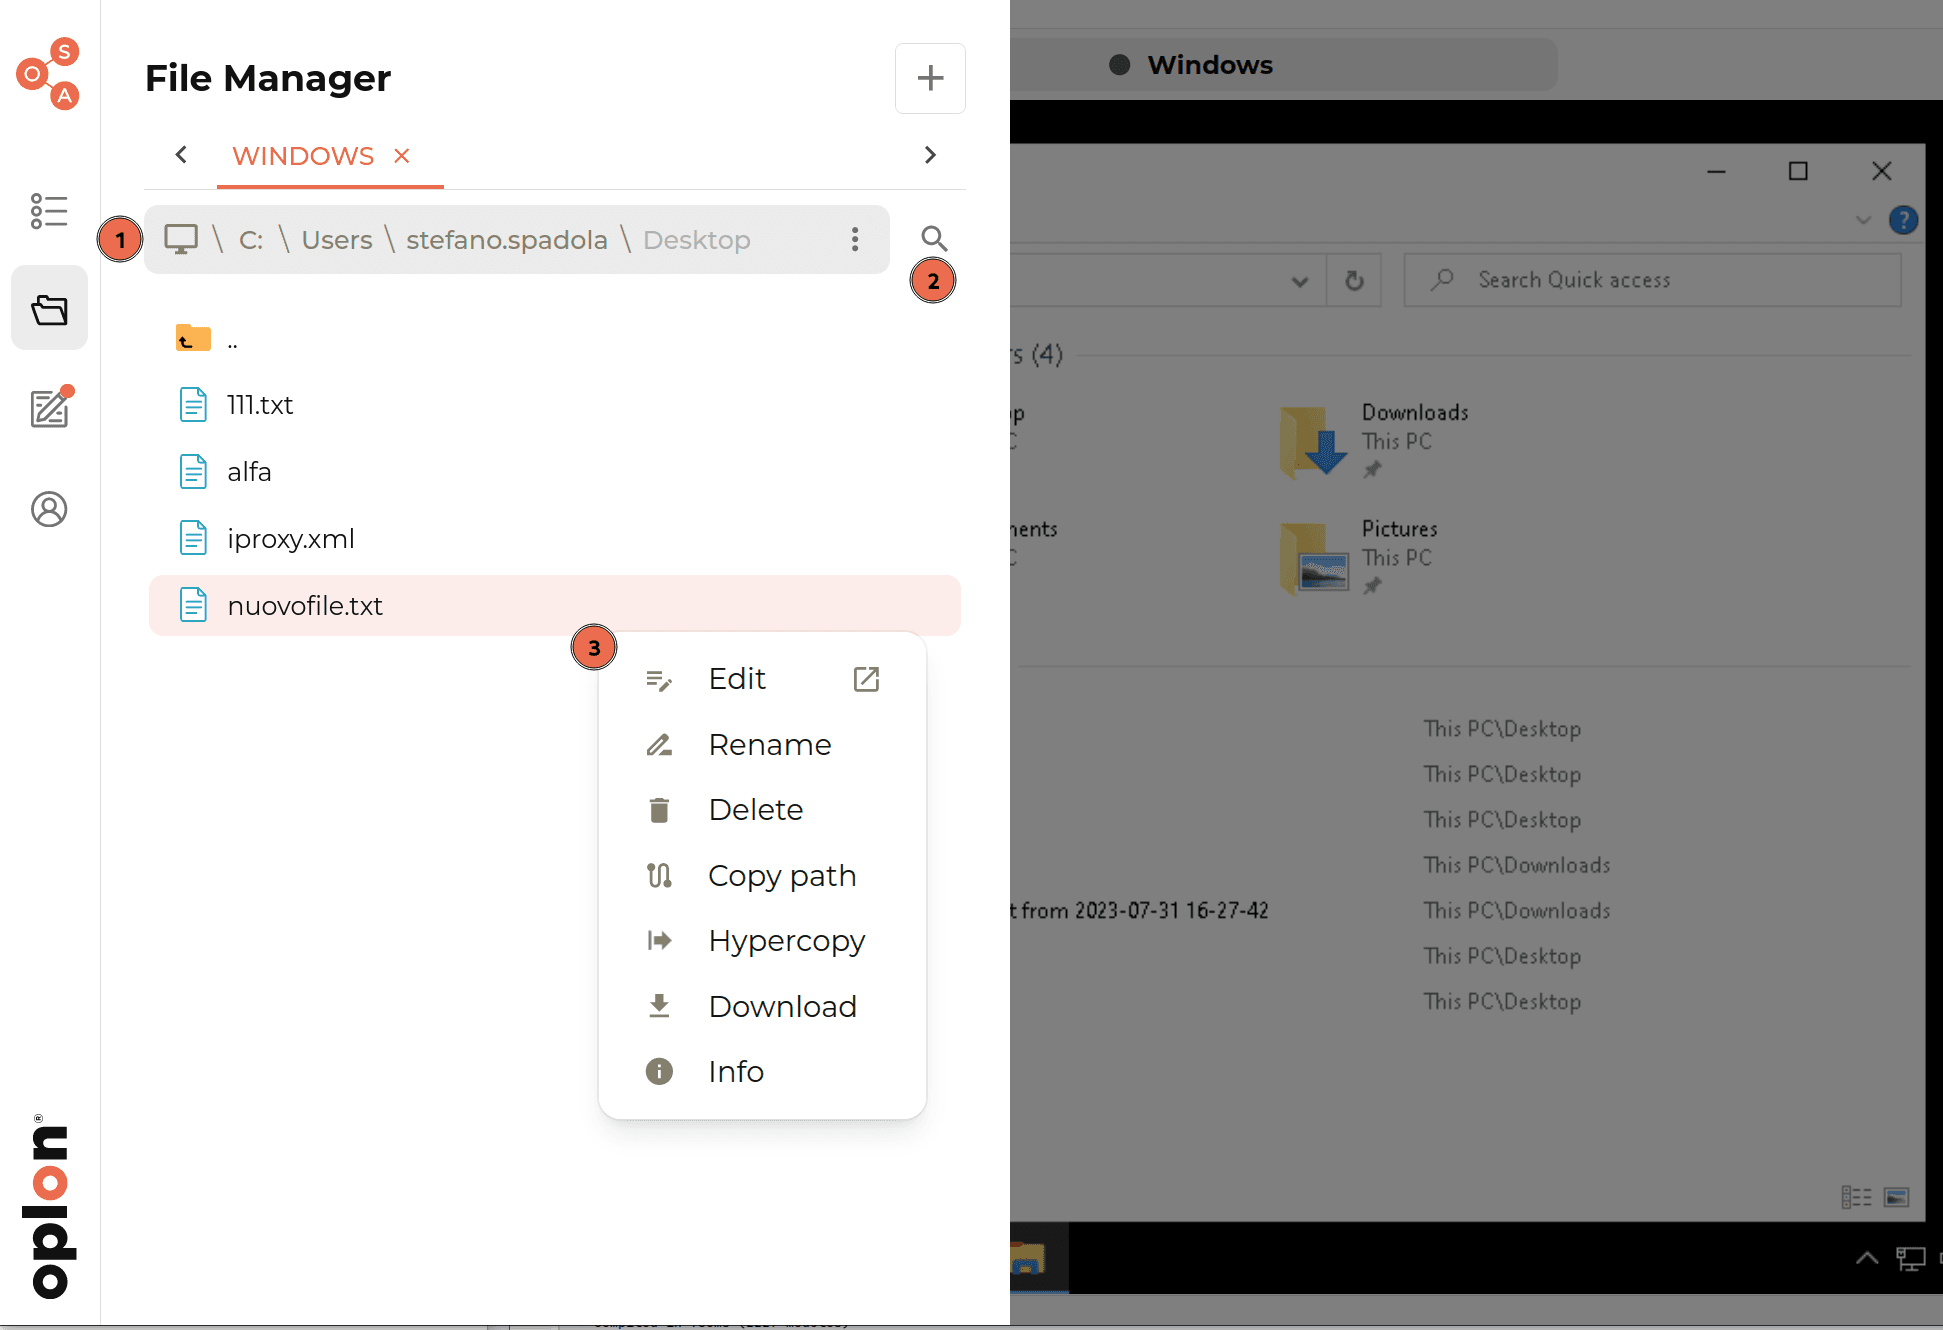
- Path bar: shows the path of the current folder; clicking it lets you type the path to go to (see Path bar and search)
- Search files: lets you search for a file in the current folder
- Menu button (three vertical dots): opens a menu that lets you:
- create a new file (New File)
- create a new folder (New Folder)
- upload files from your computer (Upload File)
- go to your home directory (Go to Home)
- copy the current path (Copy path)
- refresh the displayed content (Refresh)
- open the File Manager options (File manager options, see Columns)
- File Manager Context Menu: the files’ context menu, opened with the right mouse button. From here you can access:
- opening in the File Editor (Edit, multiple)
- renaming files
- deleting files and folders (multiple)
- copying the path
- enabling multi-selection
- Hypercopy (multiple)
- Download (multiple)
- file info
The same three-dots menu also opens when right-clicking on an empty area of the list.
Hypercopy and Download are available for files only (not for folders). If the administrator disabled Download, Upload or Hypercopy for the resource, the corresponding entry is struck through (”… is disabled by Manager”). Double-clicking a folder opens it, while double-clicking a file opens it directly in the File Editor.
Resource tabs
The File Manager shows a tab for each open resource. The + button opens a new tab where you can search for and pick another resource (resources offering file access via SFTP or via RDP drive are listed). The X closes the tab; if the resource still has transfers in progress or files open in the editor, the tab is only hidden.
Path bar and search
- Clicking on the path bar lets you type a path (“Enter path…”) and press ENTER to go there (ESC cancels).
Windows paths with
\are accepted too. If the path is a file, its folder is opened and the file is selected - every folder of the path is clickable; the icon on the left takes you to the root
/ - the magnifier (“Search files”) filters the files of the current folder by name. The X clears the filter and, if the field is already empty, closes the search
Favorite folders
The star in the path bar adds (or removes) the current folder to favorites. Favorite folders are collected in the Favorites node at the top of the list: just click one to go there. Favorites are kept per resource and per account, also appear when choosing the Hypercopy destination folder and are not available for Session Temporary Connections.
Columns and sorting
The file list is organized in columns: Name, Modified, Accessed, Size, Size (bytes) and Permissions. By default Name, Modified and Size are visible.
- Sorting: click a column title; a second click reverses the order. The
..folder always stays on top - Width: drag the handle on the right edge of the title; a double click restores the default width
- Choosing columns: right click on the column header, or ⋮ > File manager options. From here you can show or hide columns, enable Show folders first (folders on top, on by default) and go back to the initial settings with Reset to default
- columns that don’t fit on the screen are hidden starting from the right
The same options are available in Settings > File Manager Settings.
Multi-selection
From the context menu, the Multiselection entry shows a checkbox on each row and a “select all” checkbox in the header (which, with a search active, selects only the filtered files). With more items selected the context menu shows a summary (e.g. “2 files 1 dir selected”) and actions apply to all of them. Multi-selection turns off when everything is deselected or when you change folder.
Info shows permissions, size, modification and last access date for each selected item.
Download
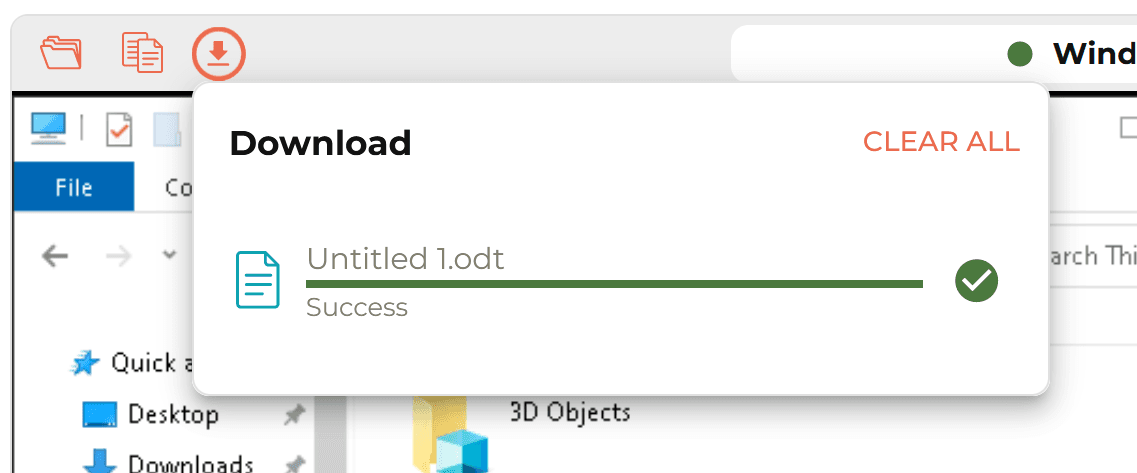
To download a file, from the File Manager, simply right-click on the file you want to download and click Download. This will start a download operation which will be handled entirely within the browser. You can follow the progress/result of the operation from the Download icon in the sidebar (see Transfer monitoring).
Upload
Uploading works by simple drag and drop of files. To do this, open the File Manager, go to the folder where you want to upload the file and drag the file into the File Manager area. Alternatively you can use the Upload File entry of the ⋮ menu, which opens your computer’s file picker (several files at once are allowed). This will start an upload procedure. You can check the status/progress of the operation from the Upload icon in the sidebar.
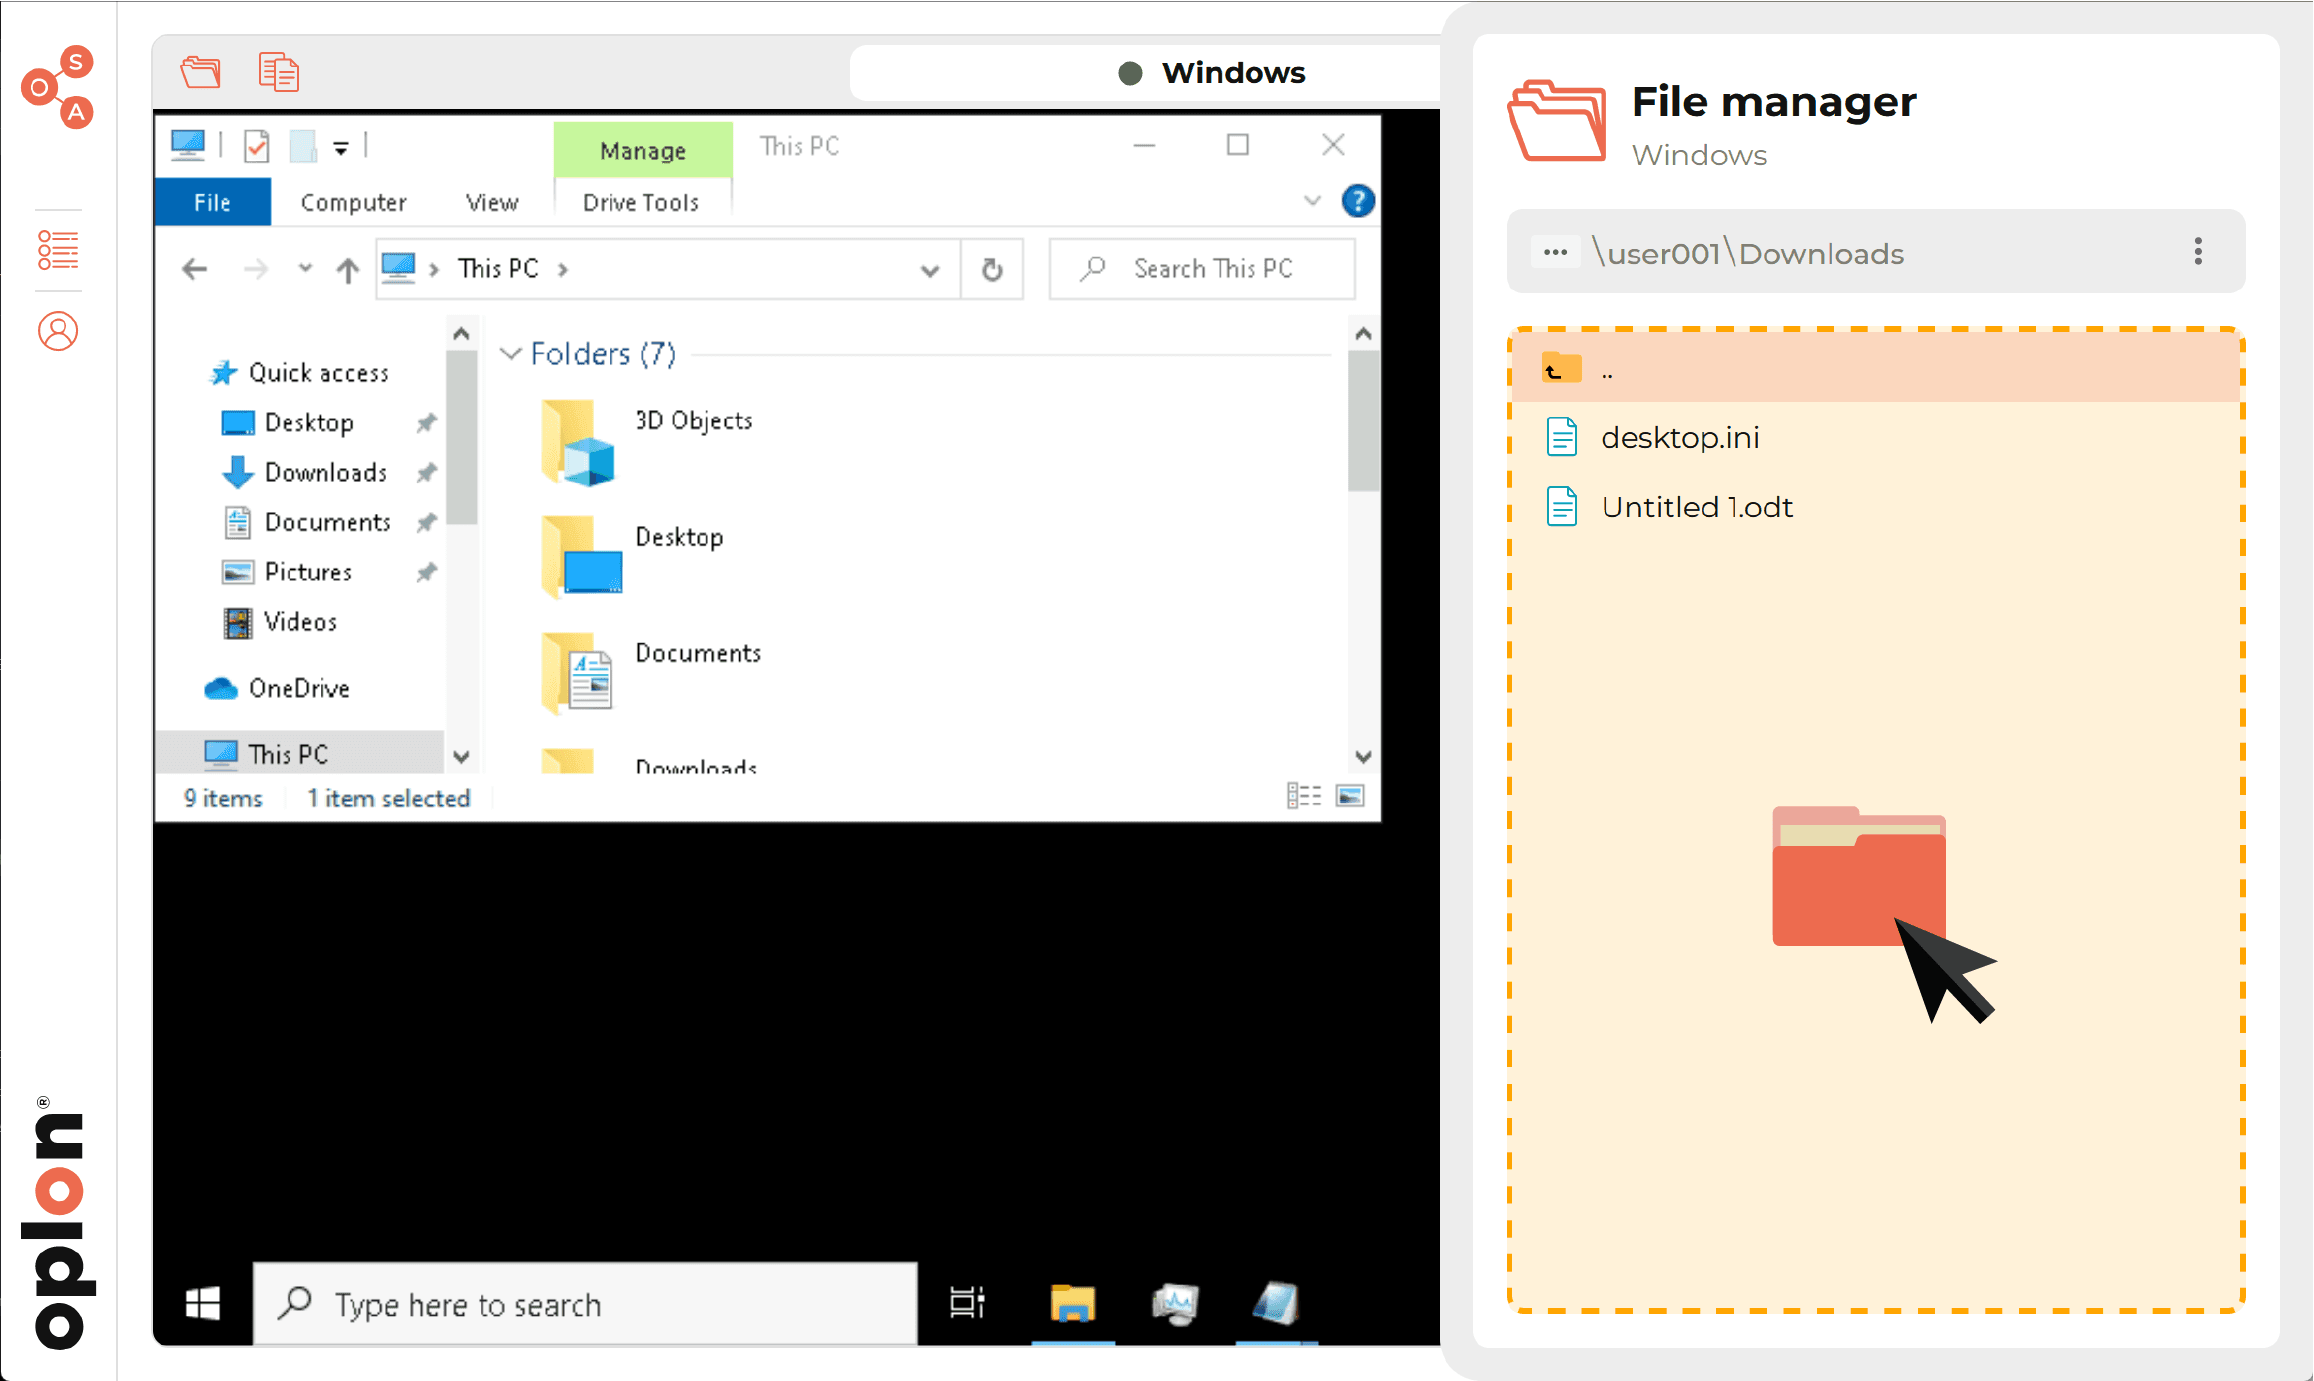
Before each upload the write permission on the destination folder is checked. When it finishes, the File Manager refreshes by itself if it is showing the folder the file was uploaded to.
Uploading by dropping files on the window
You can drag files from your computer directly onto the session window, without opening the File Manager.
While dragging, the message “Drop to upload to the directory Upload_Drag_and_Drop” appears: files are uploaded to the
Upload_Drag_and_Drop folder in the user’s home on the resource (the folder is created if it does not exist).
When it finishes, a notification shows the result (“N file(s) uploaded to Upload_Drag_and_Drop”) with the buttons:
- Open folder: opens the File Manager on the destination folder
- Copy path: copies the folder path. For RDP resources with a virtual drive you can choose between the
Windows path (
\\tsclient\VDRIVE\Upload_Drag_and_Drop) and the Linux one
This feature is not available while the File Manager is open (drop the files into the File Manager instead), for Browser Isolation resources and when the administrator disabled the File Manager or uploads (the drop area turns red with “Upload is disabled by administrator”).
Hypercopy (File Transfer)
The Hypercopy operation, i.e. the transfer of files between machines, is started by opening the context menu of the file you want to transfer (right click) and clicking Hypercopy.
This will show a dialog where, in order to successfully transfer the file, you will need to:
- Select the target machine (and the desired account, if applicable):
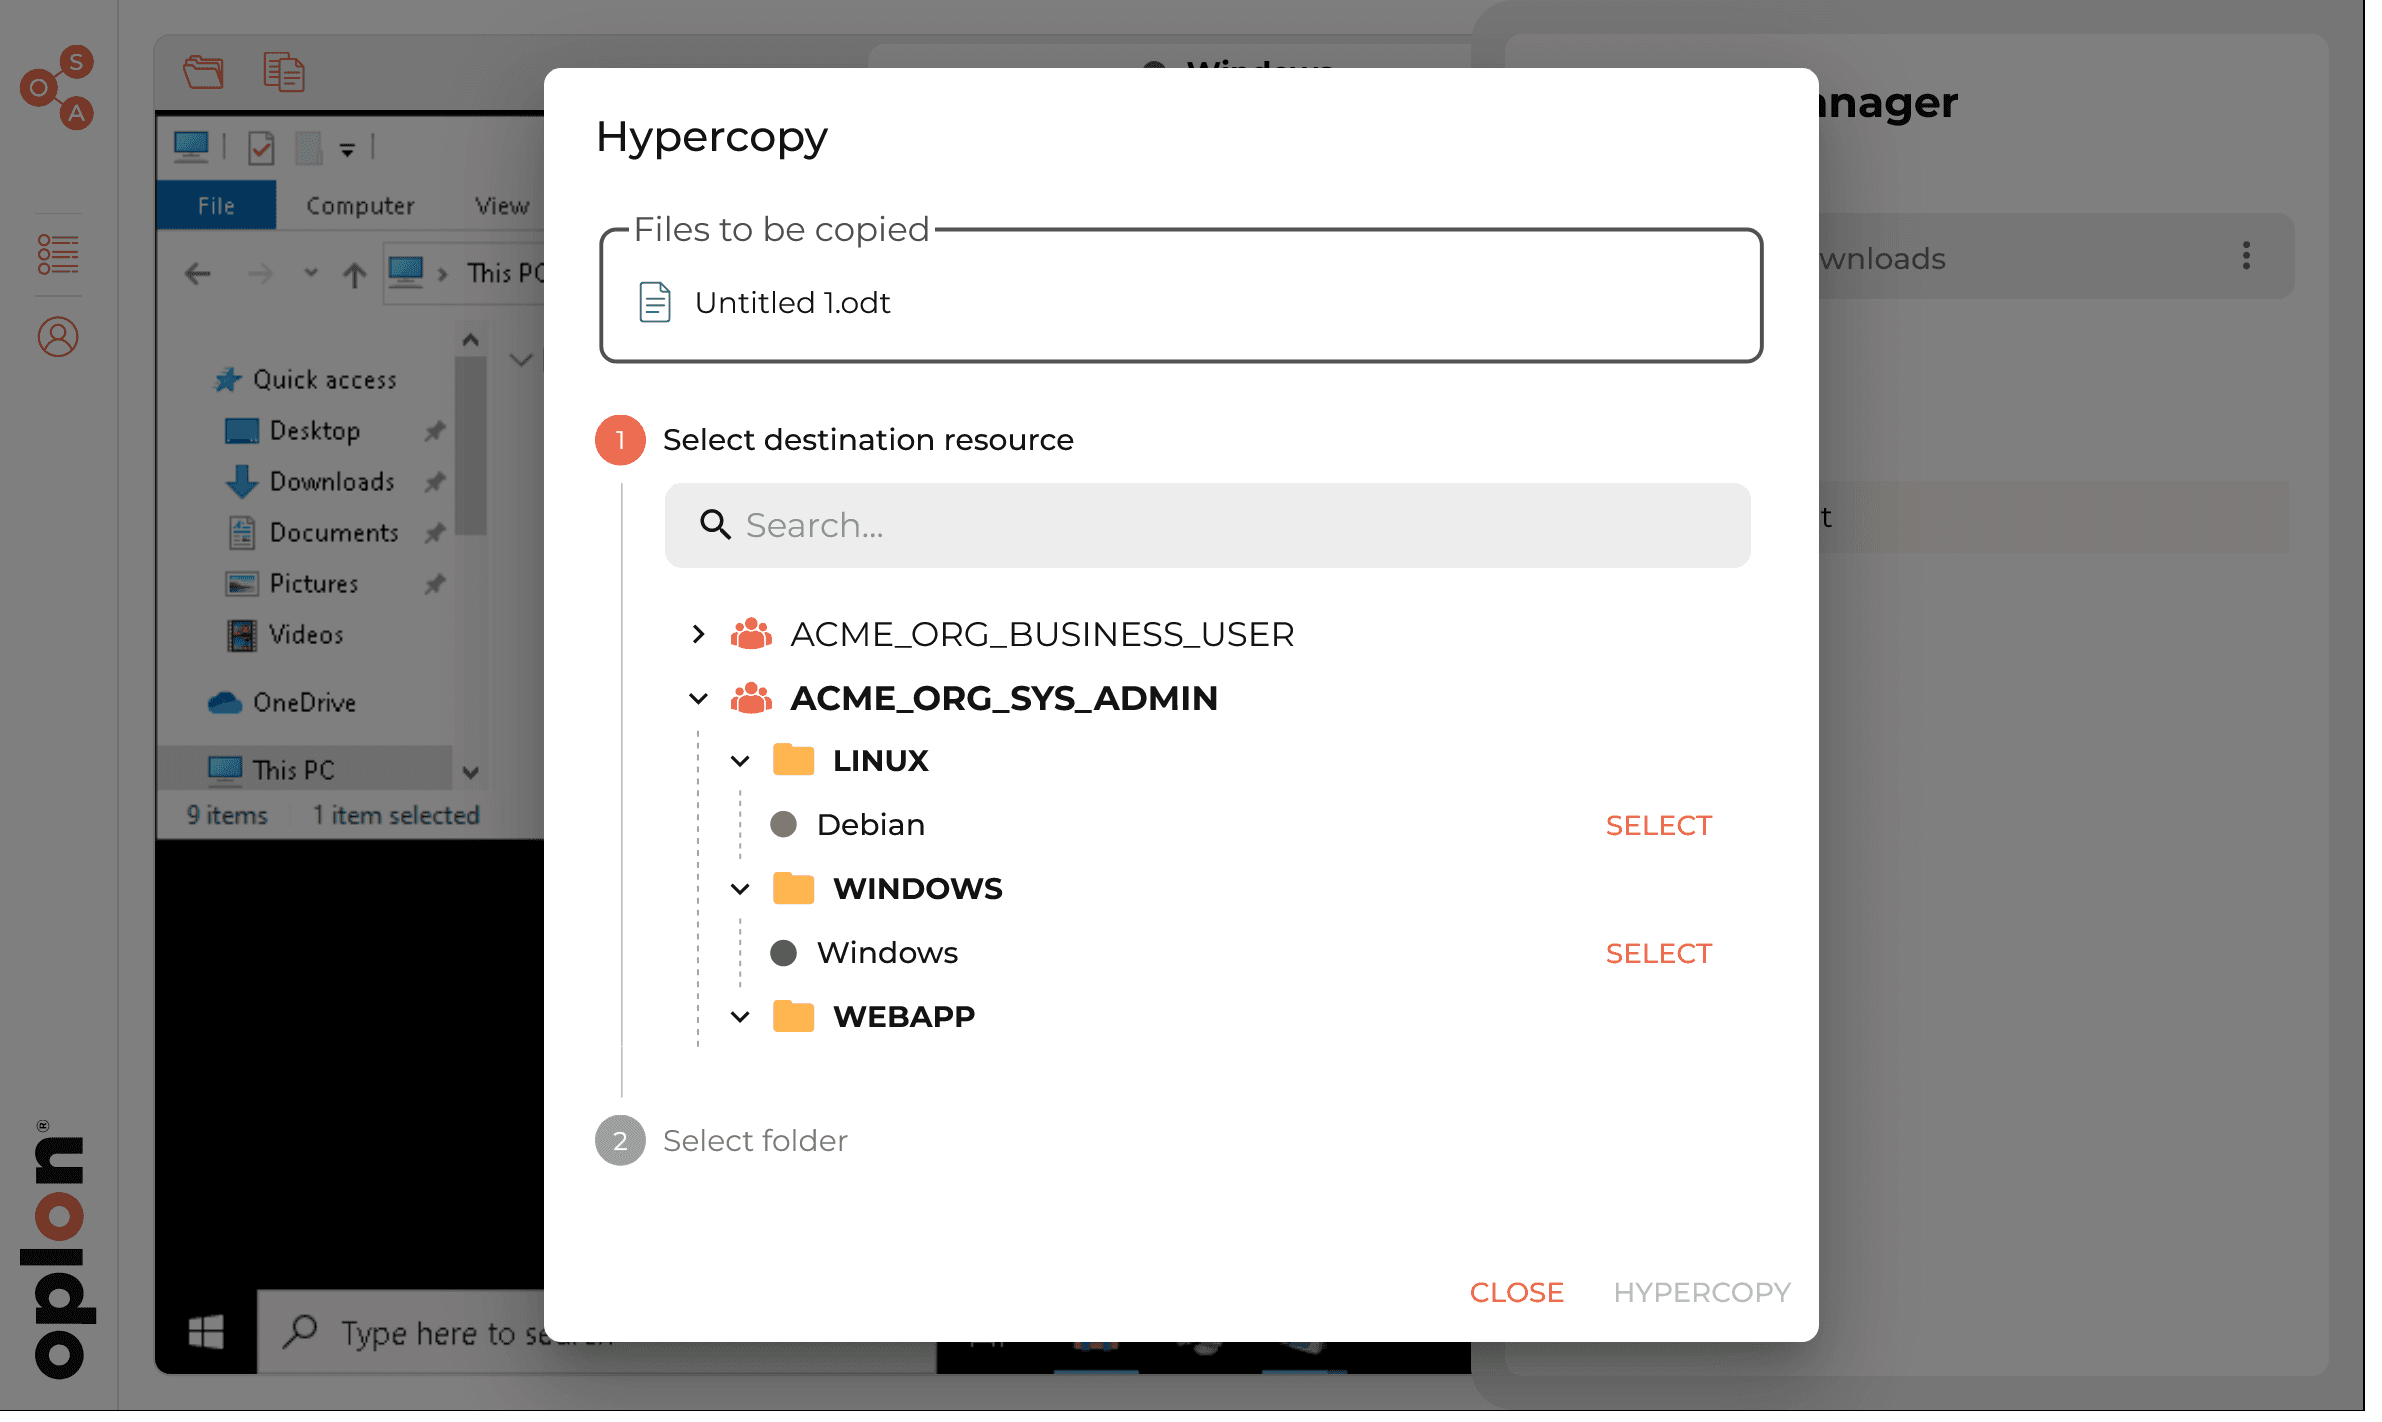
- Select the folder where the file will be copied and click Hypercopy:
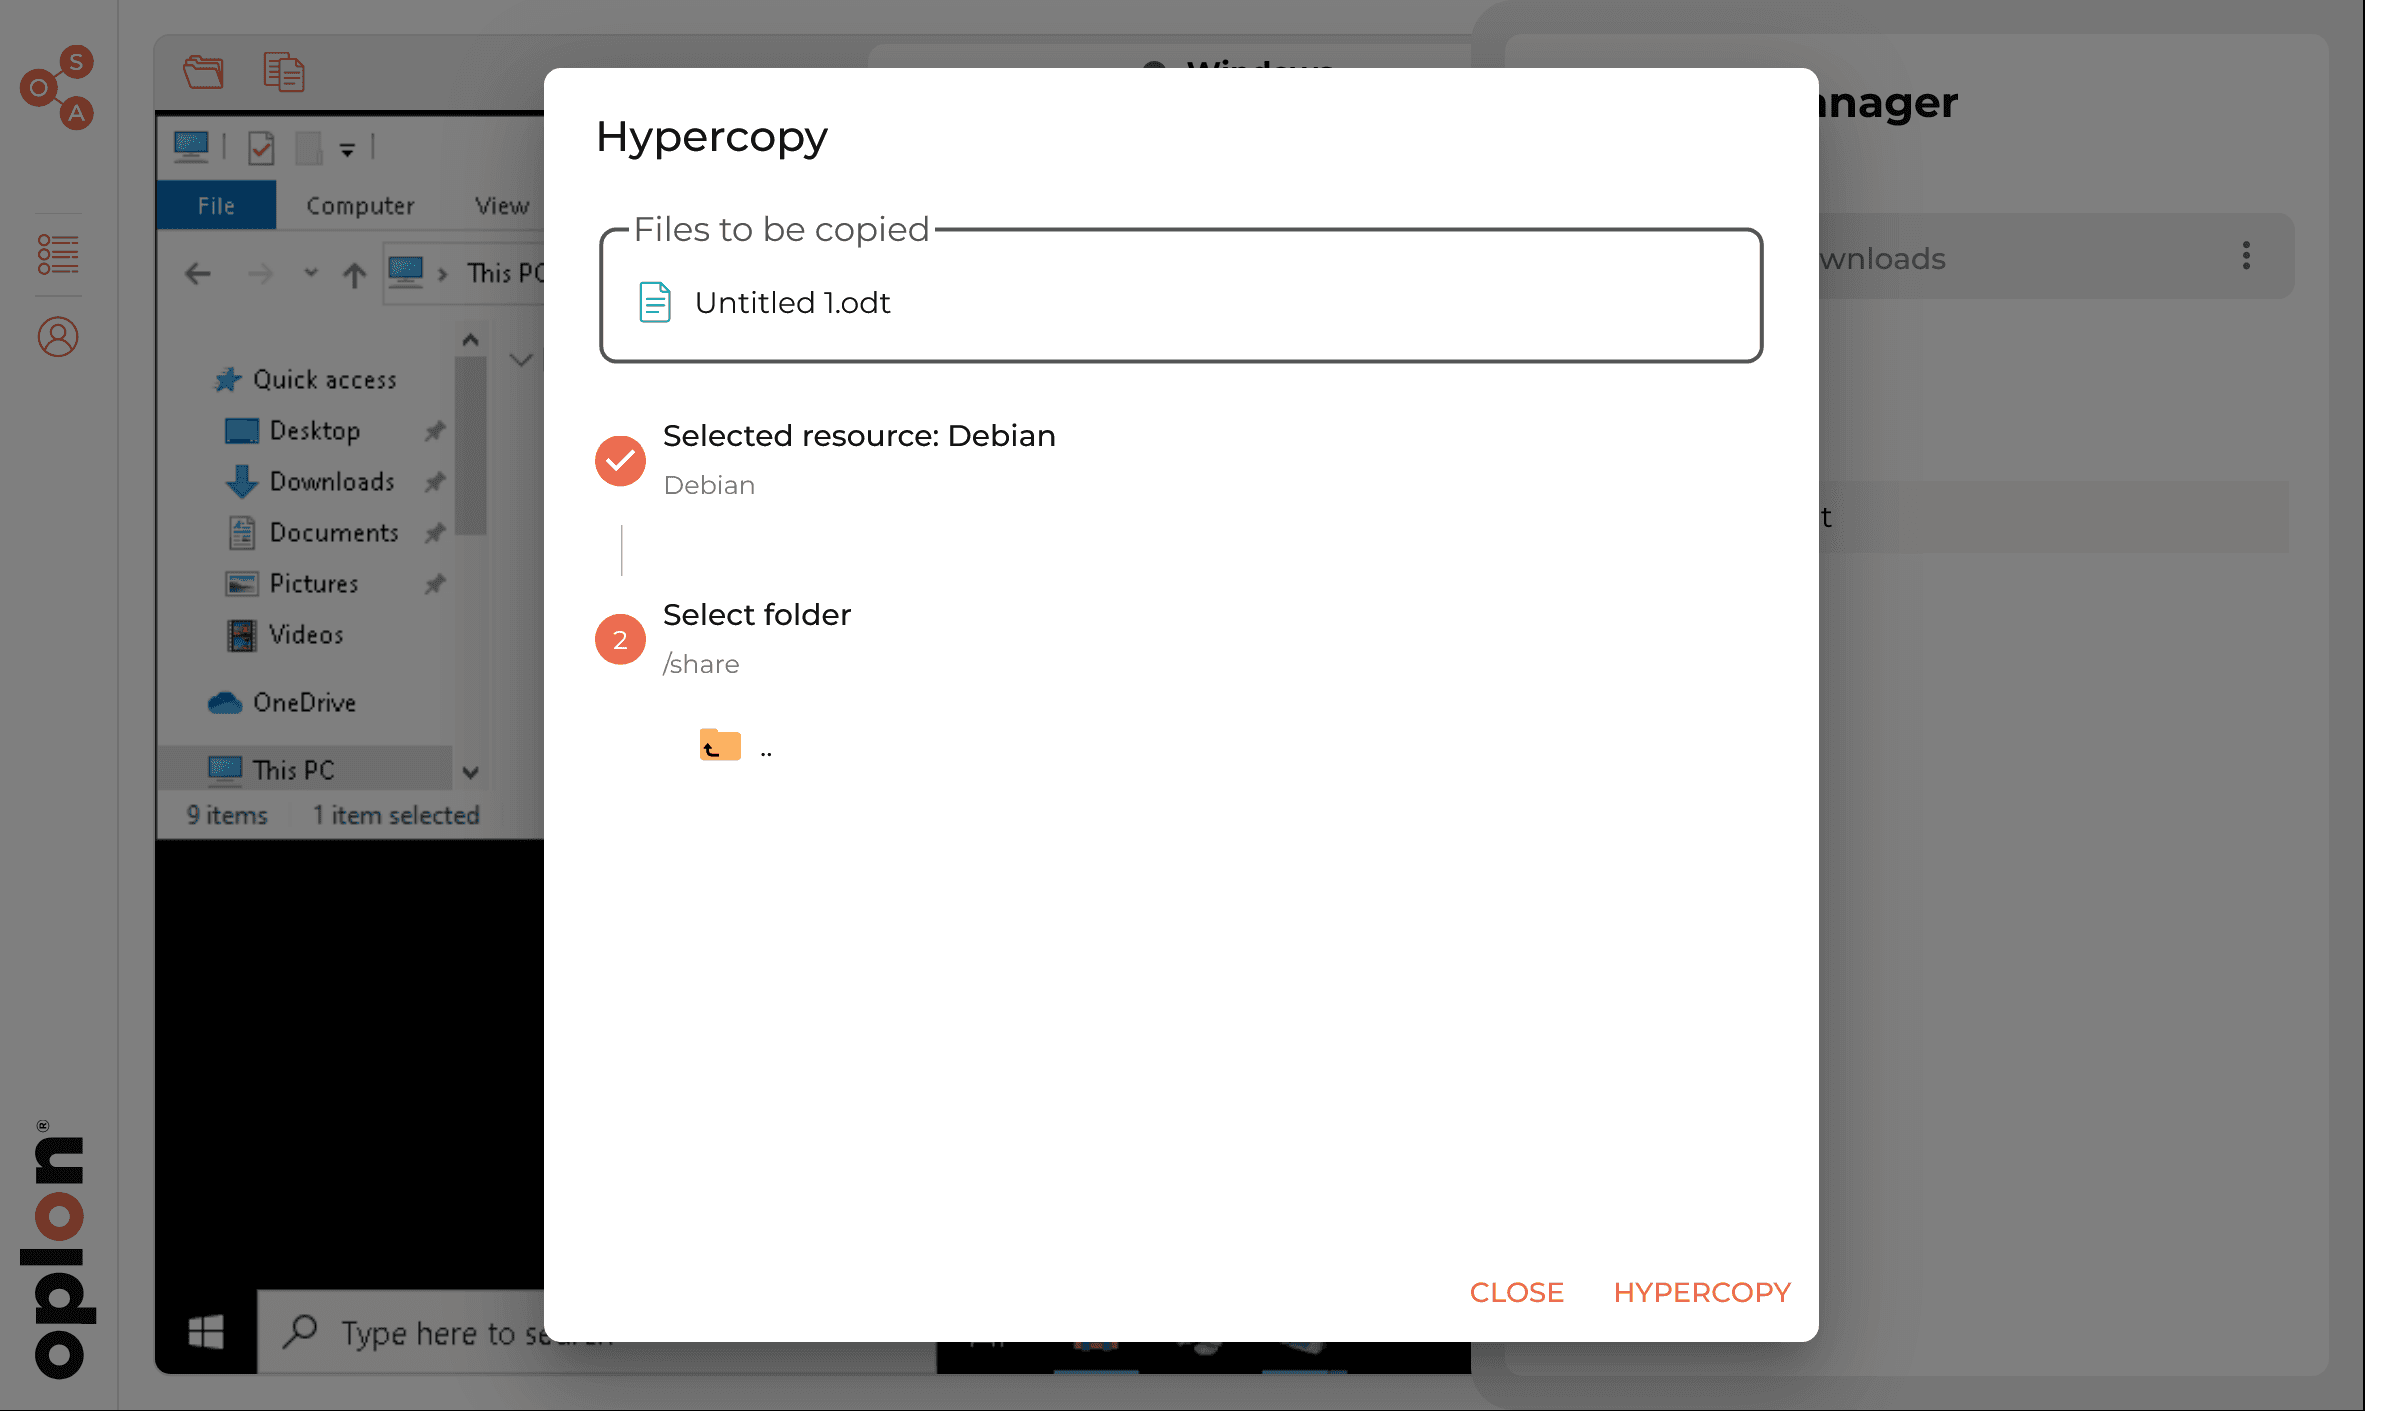
When choosing the destination a resource search bar is available. If the destination resource needs credentials, they are asked directly in the dialog. When choosing the folder you navigate with a double click or ENTER, and favorite folders are available. The Hypercopy button is enabled only once a folder has been reached.
Transfer monitoring
During downloads, uploads and Hypercopy, up to three icons (Download, Upload, Hypercopy) appear in the sidebar, below the menu icons, with a small progress bar. Clicking an icon opens the list of transfers, grouped by resource (for Hypercopy also by destination resource, “To: …”).
| State | Text | Actions |
|---|---|---|
| Waiting | Pending | X to remove it from the queue |
| Running | percentage, speed, estimated time | Stop (asks for confirmation and aborts the transfer) |
| Completed | Success | Retry and Remove (on hover) |
| Failed | Error: reason | Retry and Remove (on hover) |
| Stopped | Stopped | Retry and Remove (on hover) |
Transfers of the same type to the same resource run one at a time; the others stay in the queue. Clear all removes the successfully completed transfers from the list.
File Editor
In OSA it is also possible to edit files within the browser itself. To open a file in the editor, from the File Manager, right-click on the file and choose Edit, or double-click the file. When several files are selected they open together, each in its own tab. Files from different resources can be open at the same time.
The File Editor has its own icon in the sidebar and opens as a window over the desktop.
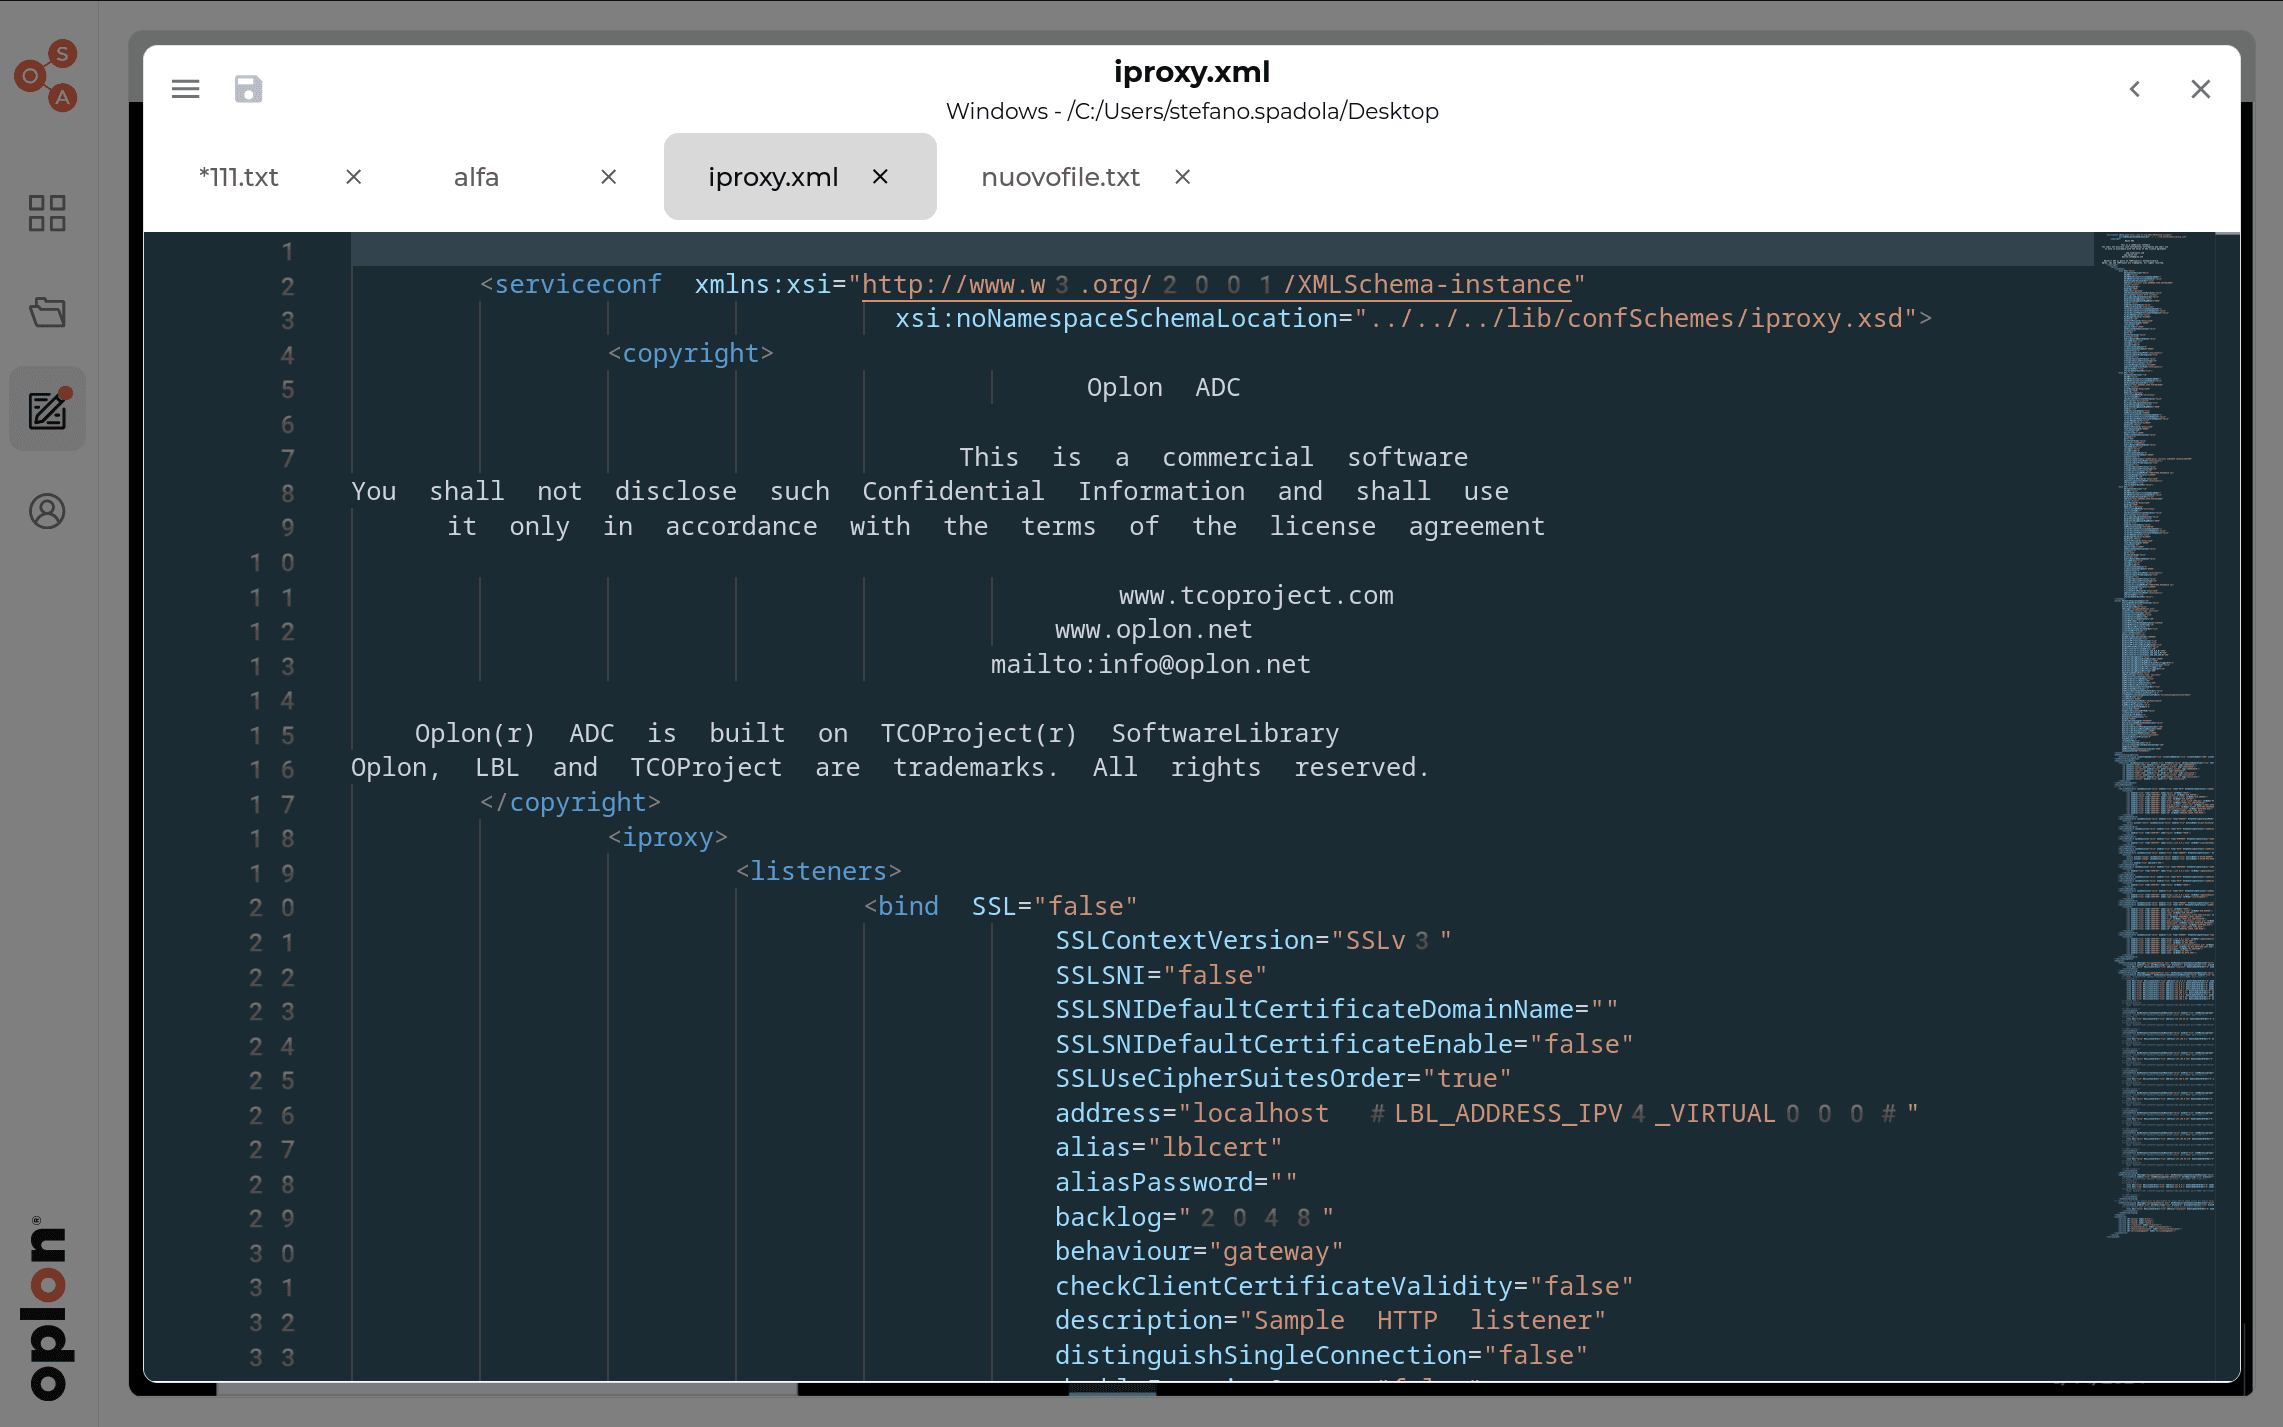
From here it is possible to edit the file, possibly change the syntax highlighting if you are editing a file with some source code, save or close.
Window and tabs
- the editor opens maximized; the restore button shrinks it to half the screen so it can be moved (by dragging the tab bar) and resized from its edges. Double-clicking the tab bar toggles between the two sizes
- the window X hides the editor but keeps the files open; the sidebar icon shows a dot if there are unsaved changes
- each tab shows the file name (the tooltip shows resource and path). A gray dot means unsaved changes. Closing a modified tab asks whether to save (Save) or discard the changes (Discard)
- two side-by-side panels: dragging a tab to the right half (“Open second panel”) opens a second panel; tabs can be moved between panels (“Move here”) and reordered by dragging them
Commands
Above the text the resource and the file path are shown, together with the commands:
- ☰: syntax choice (Syntax, 23 languages including Shell, Python, JSON, YAML, XML, SQL, PowerShell…) and theme (Theme). The theme applies to all tabs, is remembered by the browser and automatically switches to the light or dark variant together with Dark Mode
- Save (disk icon), or CTRL+S with the cursor in the editor
- Save as…: asks for a new name and a destination (even on another resource) and saves a copy; the open tab is unchanged
- show changes / hide changes: shows the last saved version (“LAST SAVE”) and the current one (“CHANGES”) side by side, while you keep editing on the right
- DIFF: compares the file with another file (see below)
The + button at the end of the tabs creates a new file (New file): on the first save you are asked where to save it, later saves go to the same destination.
If you don’t have write permission on the file, OSA tells you and offers to save it as a copy with another name in the same folder; if you lack permission on the folder, it offers to choose another destination.
Comparing two files
- Open the first file in the editor and click DIFF (“Compare with another file”)
- the File Manager opens: find the second file and choose Show Diffs from the context menu (or double-click it)
- a
fileA <-> fileBtab opens with the two files side by side and the differences highlighted, read-only
Moving to another section of the sidebar cancels the pending comparison.
Copy & Paste (Shared Clipboard)
In OSA any text copied from the remote resource with the usual methods (CTRL+C, right click > Copy, text selection in SSH, etc.) is made available in the local clipboard of the logged-in user, so you can access it outside OSA (e.g. in your notepad). In RDP/VNC sessions images are copied too.
Pasting, instead, follows different rules depending on the browser you use to connect to the platform:
- Pasting with the usual shortcuts CTRL+V, CMD+V, SHIFT+INS (RDP/VNC) is always available whatever the browser. In SSH sessions use CTRL+SHIFT+V (CMD+V on Mac)
- Pasting with any other method, e.g. right click > Paste (graphical sessions) or right click (in SSH), is available:
- on Chrome/Chromium/Edge/Opera by enabling the Shared Clipboard setting from the Settings menu
- on Firefox/Safari (or on all other browsers if the Shared Clipboard is disabled) through the Graphic Clipboard, which opens with the button at the top left next to the File Manager icon (or by right-clicking in SSH) and lets you:
- only send the text to the remote clipboard (Send To Clipboard)
- send the text and simulate its typing (Simulate Typing)
More details:
- Images: PNG and JPEG images up to 16 megapixels / 32 MB can be pasted into RDP/VNC sessions. If an image is too large but the same copy also contained text, the text is pasted
- Text or image: when the copy contains both text and an image, the text is pasted, unless the text is just a reference to the image (e.g. a URL or a file name)
- Several open windows: when you click on a remote window, the latest copied content is sent to it (from another window or, with the Shared Clipboard enabled, from the local clipboard). On the first click in a session the browser asks for permission to read the clipboard
- for heavier copies the “Copying from the remote desktop…” indicator appears at the bottom
- if a copy from the remote session can’t reach the local clipboard (for example because the page was in the background) a notification appears with the Sync now button to retry
The administrator can disable copy and/or paste per resource. In that case the related commands are disabled and a message such as “Paste is disabled by administrator” is shown.
Enabling and disabling Copy & Paste
In RDP/VNC sessions the Enable/Disable copy & paste button in the window bar turns clipboard sharing in both directions on or off, with immediate effect. In the window settings, under Copy & Paste, you can switch Copy (remote to local) and Paste (local to remote) separately.
Graphic Clipboard
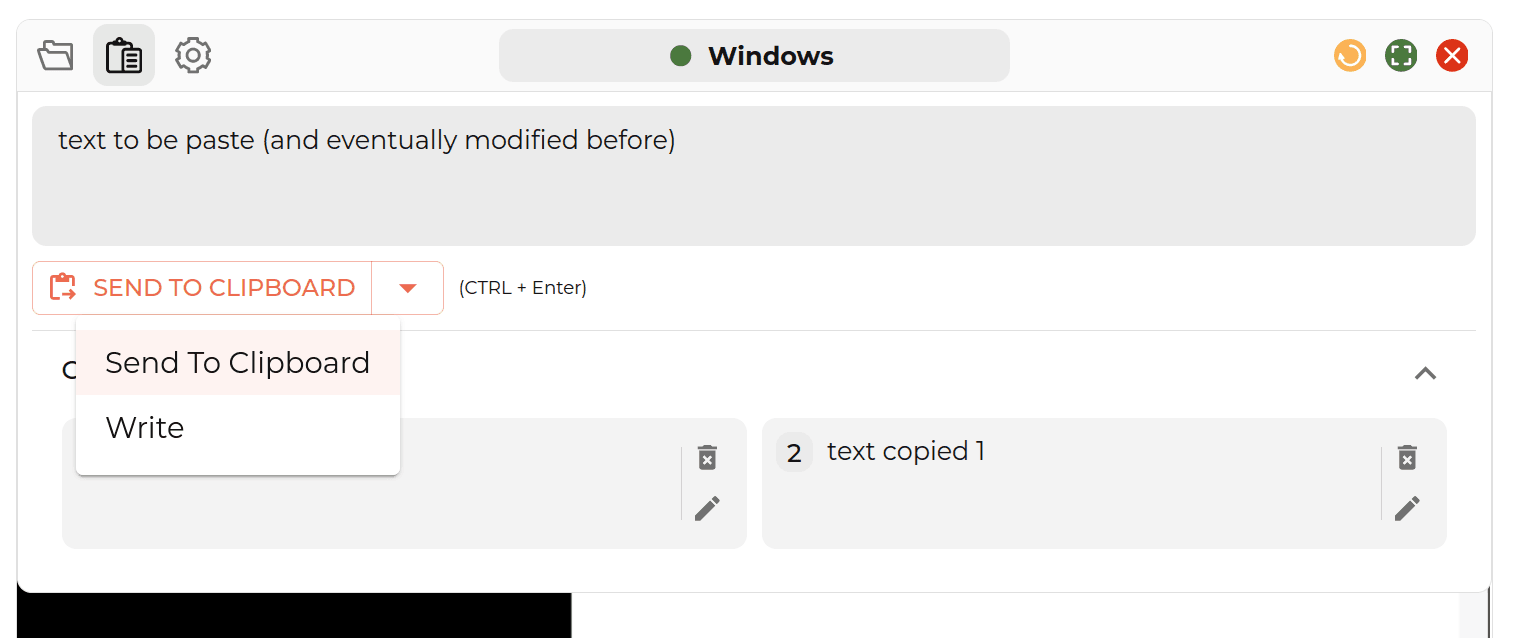
The Graphic Clipboard, which you open with the appropriate button at the top left of the current window or by right-clicking in SSH sessions, lets you send text to the remote clipboard in graphical form.
In RDP/VNC sessions there are two sending modes, selectable from the drop-down of the send button:
- Send To Clipboard: send only to the remote clipboard (in the memory area); then paste with CTRL+V in the session
- Simulate Typing: “simulation” of a writing keyboard. The Delay slider (0–60 ms, default 30 ms) sets the pause between characters. Characters are typed according to the Keyboard language set in Settings: if it does not match the remote machine’s layout some symbols may come out wrong
In SSH sessions there is a single Paste button. In all cases you can also send with CTRL+ENTER.
While long texts are being typed, the “Typing into the remote desktop…” indicator appears at the bottom with the characters sent, the estimated time and the Cancel button to stop.
Furthermore, there is also a history (Recent sends) that includes the last 7 sends made from the Graphic Clipboard: double-click an entry to send it again, use the pencil to load it into the text field and edit it, the bin to delete it. The history is shared by all windows and is cleared when the page is reloaded.
SSH terminal
Terminal search
In SSH sessions the Search button (magnifier) in the window bar opens a search bar at the top right of the terminal. The search runs as you type: all matches are highlighted and the counter shows the current position (e.g. “2/5”).
- Aa (Match Case): case-sensitive search
- ab (Match Whole Word): whole words only
- .* (Use Regular Expression): treats the text as a regular expression
- ENTER / SHIFT+ENTER (or the arrows): next / previous match
- ESC (or the X): closes the search and removes the highlights
Other terminal features
- web addresses in the terminal output are clickable and open in a new tab
- right click pastes the clipboard content directly if the Shared Clipboard is enabled; otherwise it opens the Graphic Clipboard
- the window settings (gear icon) offer:
- Theme: terminal color theme
- Font Size: font size (12 to 42)
- Scrollback lines: number of lines kept in the history (1000 to 50000)
- Copy On Select: automatically copies the selected text to the local clipboard (on by default)
These settings apply immediately and are valid for the current window.
Broadcast Mode (SSH only)
With SSH access, OSA lets you broadcast commands to up to 4 resources. To enable the broadcast mode, once all the terminals where you want to broadcast commands have been opened, just click the Enable Broadcast button in the window bar: the selected terminal is set as “primary”, while all the others are set as “secondary”.
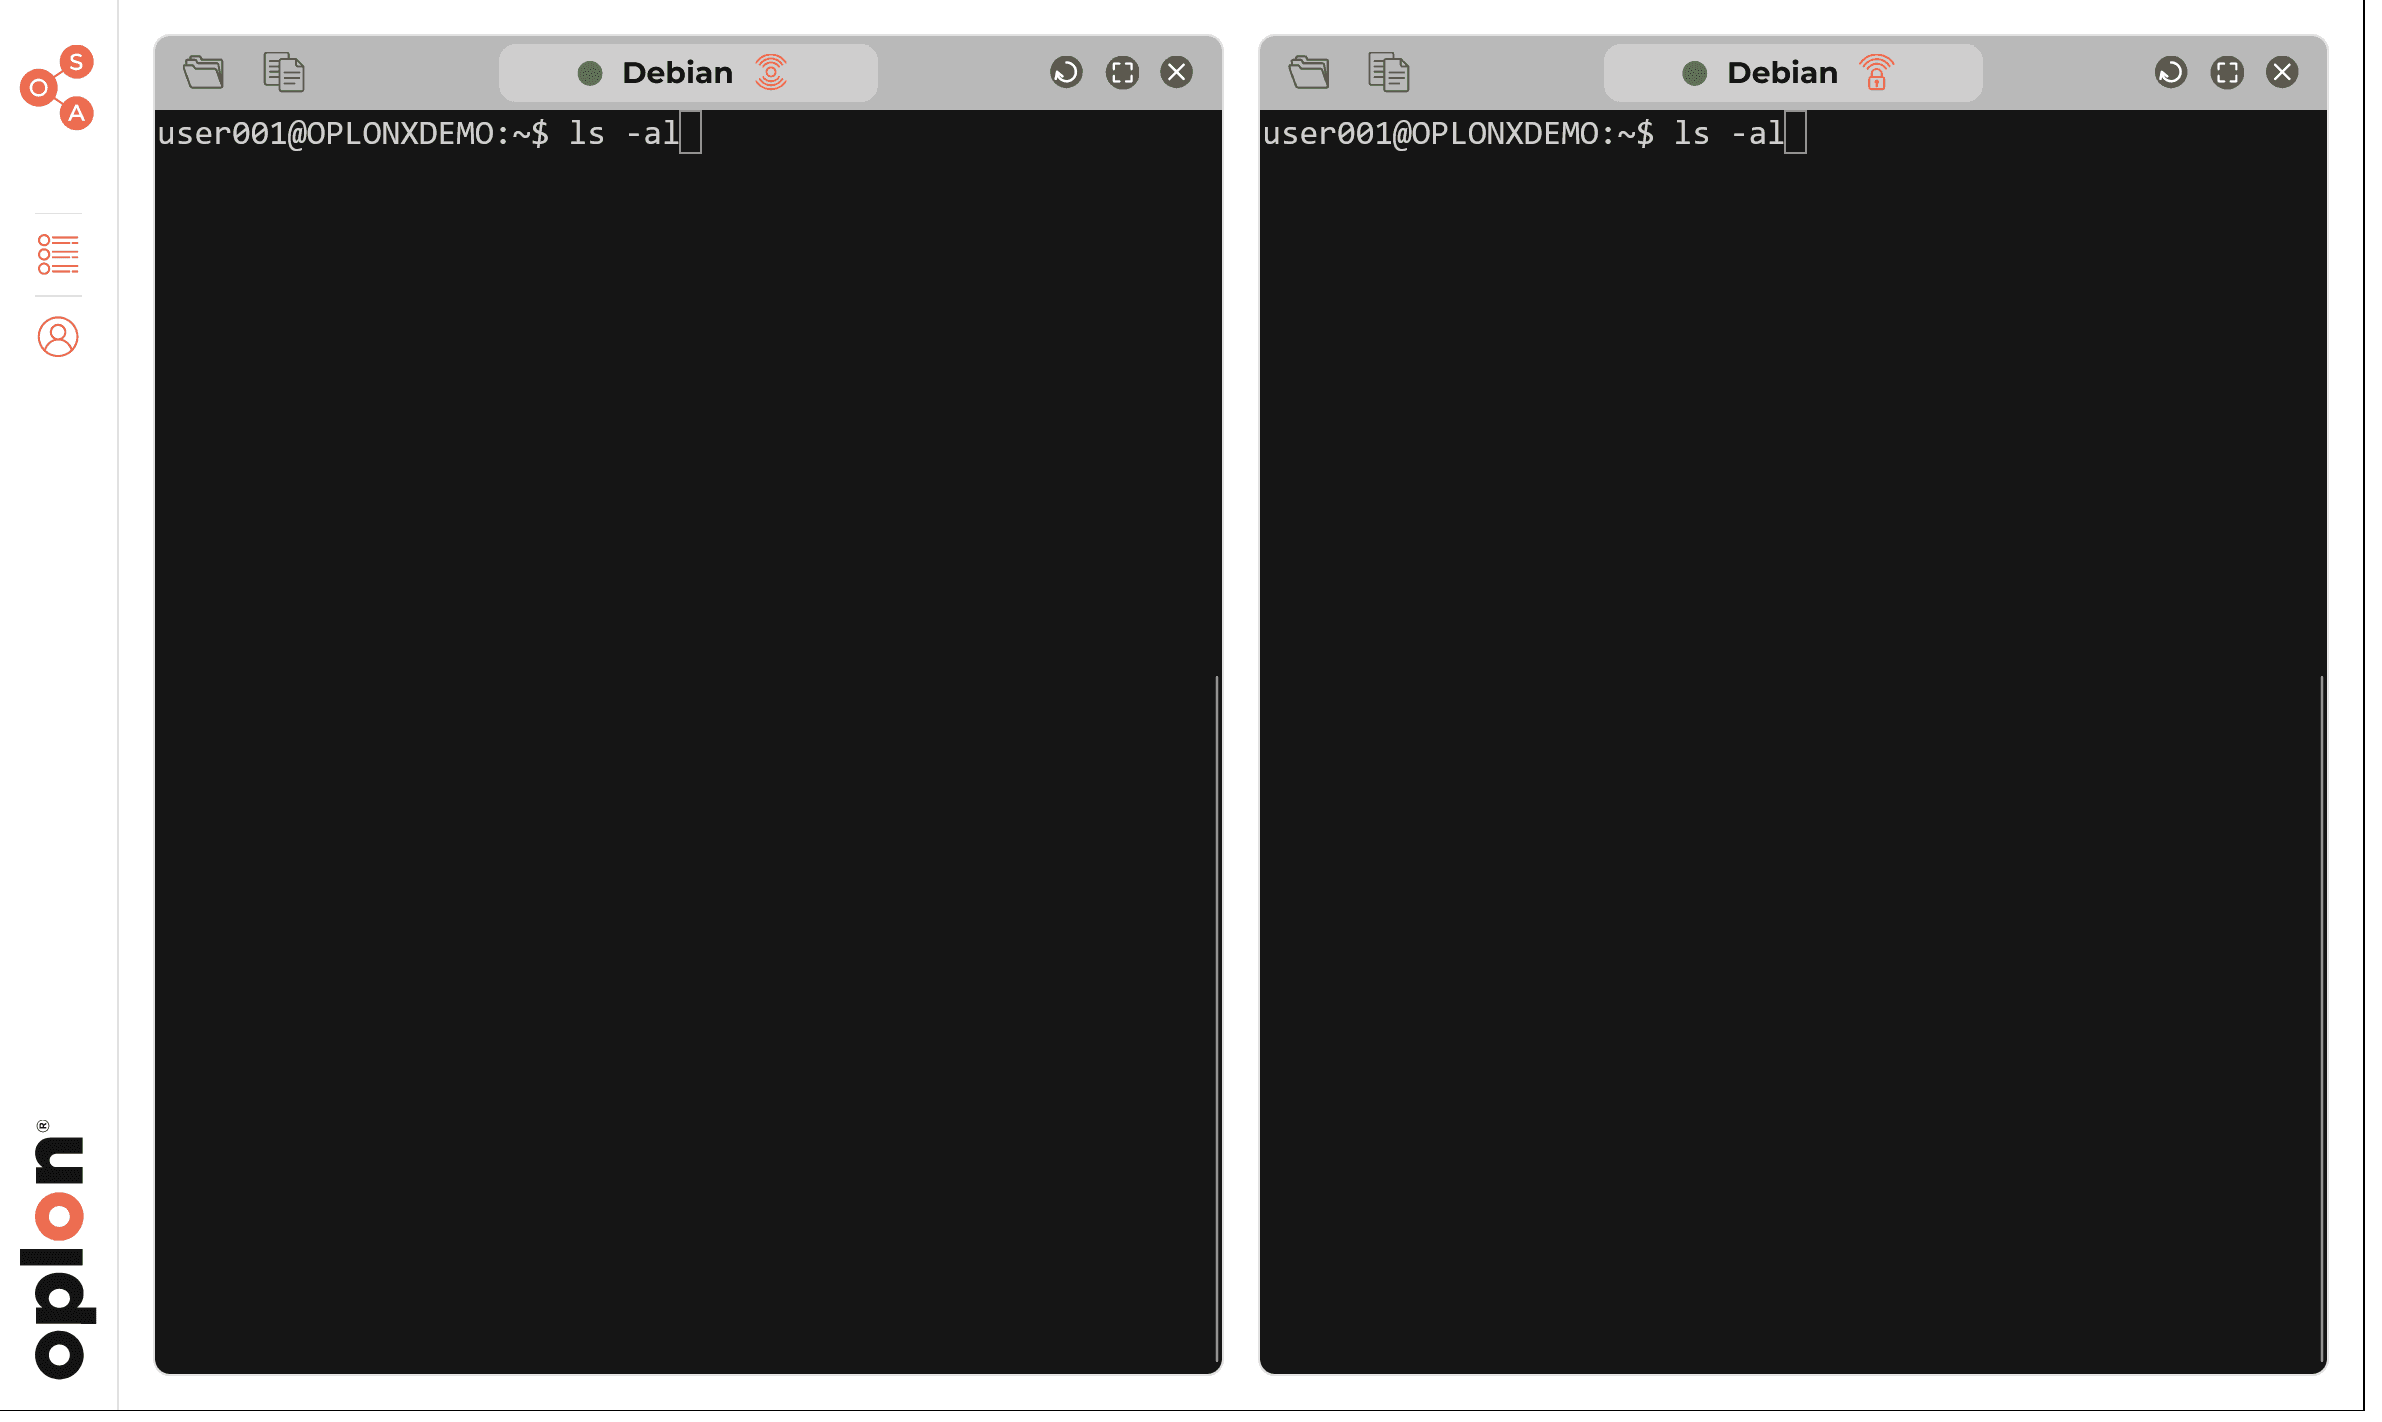
Everything typed or pasted in the primary terminal is repeated in the secondary terminals. You cannot type in the secondary terminals: at every attempt the broadcast icon flashes and after a few attempts the warning “Your shell is hooked to broadcast” appears with the Unhook button.
You can also unhook/hook terminals on demand if you want to temporarily stop using the mode on one or more terminals: just click the broadcast button of the secondary terminal (Unhook from Broadcast / Hook to Broadcast).
To end broadcast mode, click the broadcast button of the primary terminal again (Disable Broadcast) to unhook all the others too. Closing the primary terminal window also ends broadcast mode.
Window settings (RDP/VNC)
The gear icon in the window bar opens the settings of the single session. Some of them require a reconnection: in that case the message “The settings have been changed, you need to reload to take effect” appears with the button to reload.
| Setting | Description | Reconnection |
|---|---|---|
| Audio (Audio In / Audio Out) | Local microphone to the remote session / remote audio on the local speakers | Yes |
| Copy & Paste (Copy / Paste) | Clipboard sharing in the two directions | No |
| Visual Effects | Wallpaper, themes, window animations (off by default; may slow down slow connections) | Yes |
| ClearType | Sharper font rendering | Yes |
| Auto-scale VNC | (VNC only) Fits the remote screen to the window size | Yes |
| Display quality | Recommended (sharp and correctly sized, best choice), Compact (sharp, more content on screen), Standard (maximum compatibility, slightly softer image) | Yes |
| Virtual Printer | Enables the virtual printer | Yes |
| Touch Mode / OSK Mode | See Touch devices and On-screen keyboard | No |
| Insert keys | Sends key combinations to the session (see below) | No |
| Zoom | Magnifies the remote screen from 100% to 250% | No |
Settings that the administrator disabled for the resource are grayed out.
Insert keys
Used to send key combinations that your local computer would intercept (for example CTRL+ALT+DEL). Select the desired keys in the Insert keys field (they are pressed together and then released together) and click the send button. Modifier keys, function keys F1–F24, navigation keys, keypad, SUPER (Windows), PRINTSCREEN and others are available. The last 3 combinations sent are offered in the history section.
Virtual printer
With the Virtual Printer enabled, whatever is printed from the remote session reaches the browser as a PDF file and is downloaded automatically. While it is being received, a printer icon with the progress appears in the window bar; clicking it opens the list of print jobs, from which you can download a PDF again or remove it (Clear all removes the completed ones).
Touch devices
On tablets and touch devices (with Enable Touchscreen active in Settings) two modes are available (Touch Mode):
- Touchscreen (absolute mode): a tap is a left click on the touched point, a long press is a right click. Two fingers zoom the remote screen (pinch-to-zoom) and one finger pans the screen when it is larger than the window
- Touchpad (relative mode): your finger moves the pointer as on a touchpad. Tap = left click, two-finger tap = right click, three-finger tap = middle click, three-finger scroll = mouse wheel. Useful when more precision is needed
On-screen keyboard (OSK)
The keyboard button in the window bar (RDP/VNC) opens the on-screen keyboard, available in two modes (OSK Mode):
- Textbox: a text field (“Type here to write into your remote session :)”) where you type with the device keyboard; characters are sent to the session. CTRL and ALT keys (held until the next character), ESC and TAB are also available
- Virtual Keyboard: a full emulated keyboard that can enter any character. From the keyboard’s ⋯ button you choose where to dock it (left, right, bottom, or detached and draggable anywhere); dragging its edge resizes it
The on-screen keyboard language (OSK language) and default position (OSK Anchoring) are set in Settings.
Mac keyboards
When connecting to an RDP session from a Mac, the left CMD key is sent as CTRL: the usual CMD+C / CMD+V shortcuts therefore work in the Windows session too. The right CMD key stays the Windows key. Also, keys left pressed are released automatically when you switch window (e.g. ALT+TAB) or browser tab.
Browser Isolation
Regarding Browser Isolation, opening a resource is very similar to opening an RDP/SSH/VNC. In fact, once opened, the resource is shown in a dedicated screen that displays a real browser, ready for browsing.
In fact, more or less the same features apply, such as Copy & Paste and the File Manager to upload/download files from web portals.
Once you open a Web App in Browser Isolation, it looks like this:
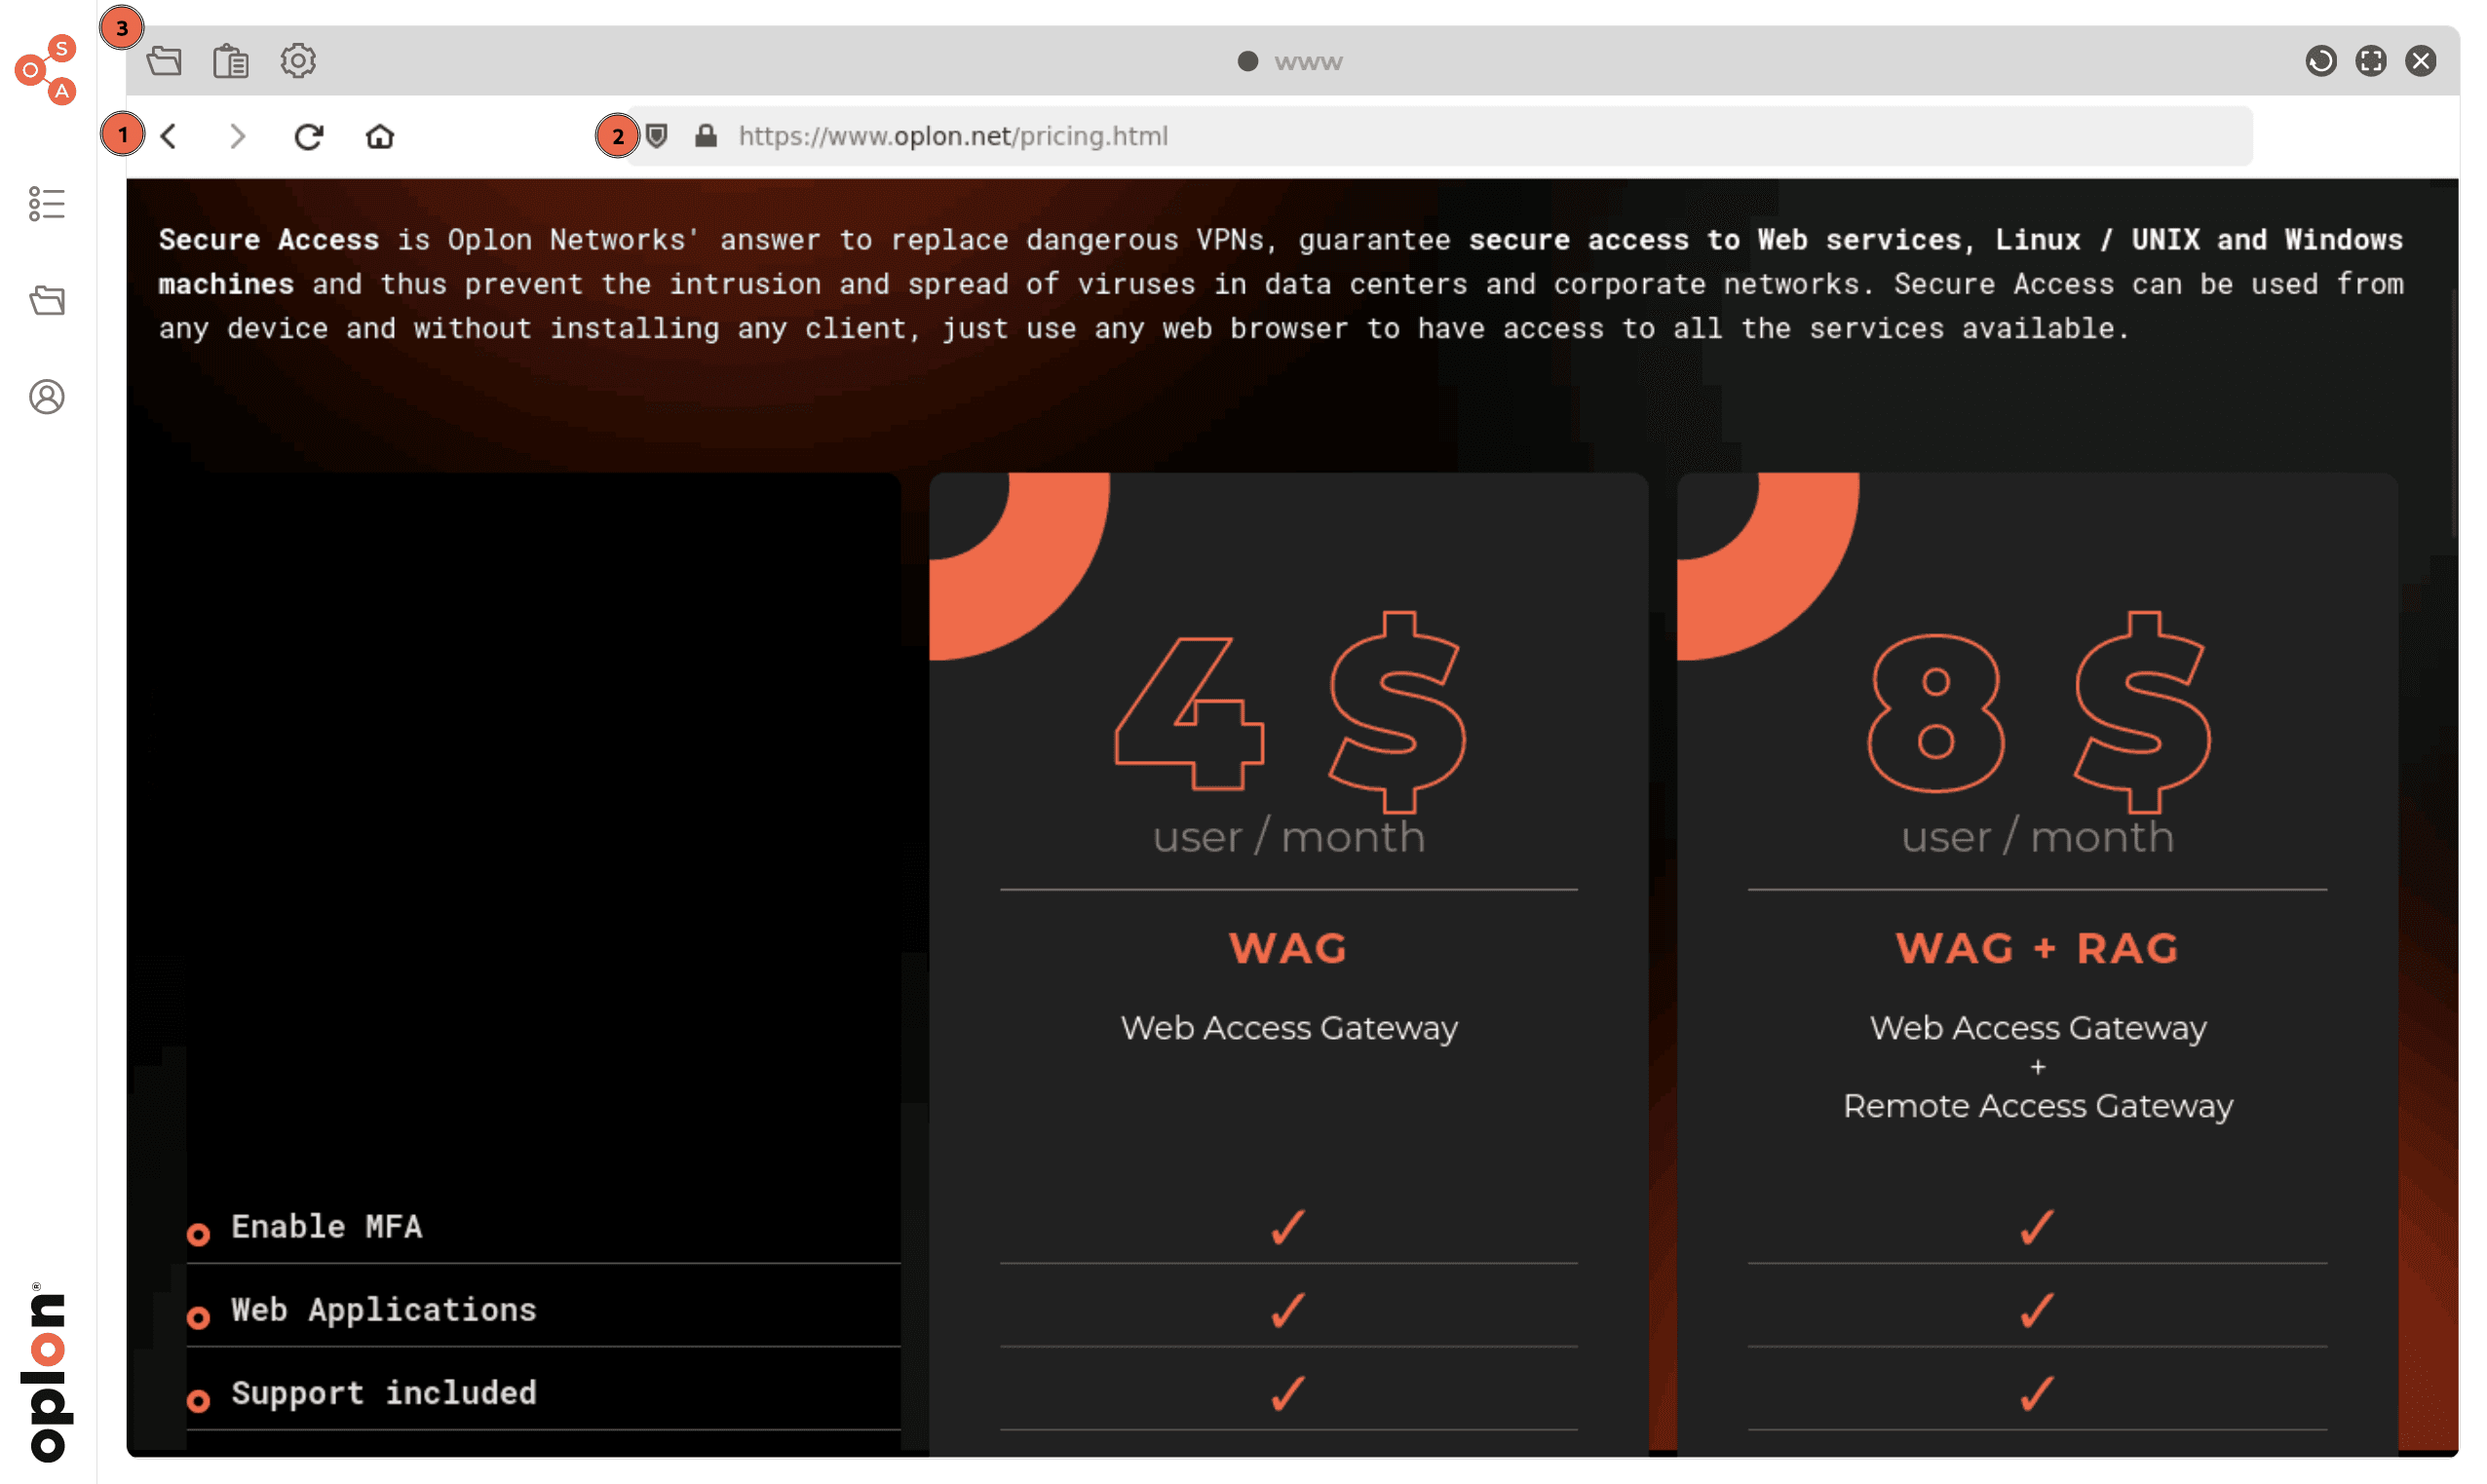
Where:
- The navigation controls: page forward, back, reload and homepage
- The address bar
- The File Manager, to exchange files and folders with the isolated browser session
Browser Isolation File Manager
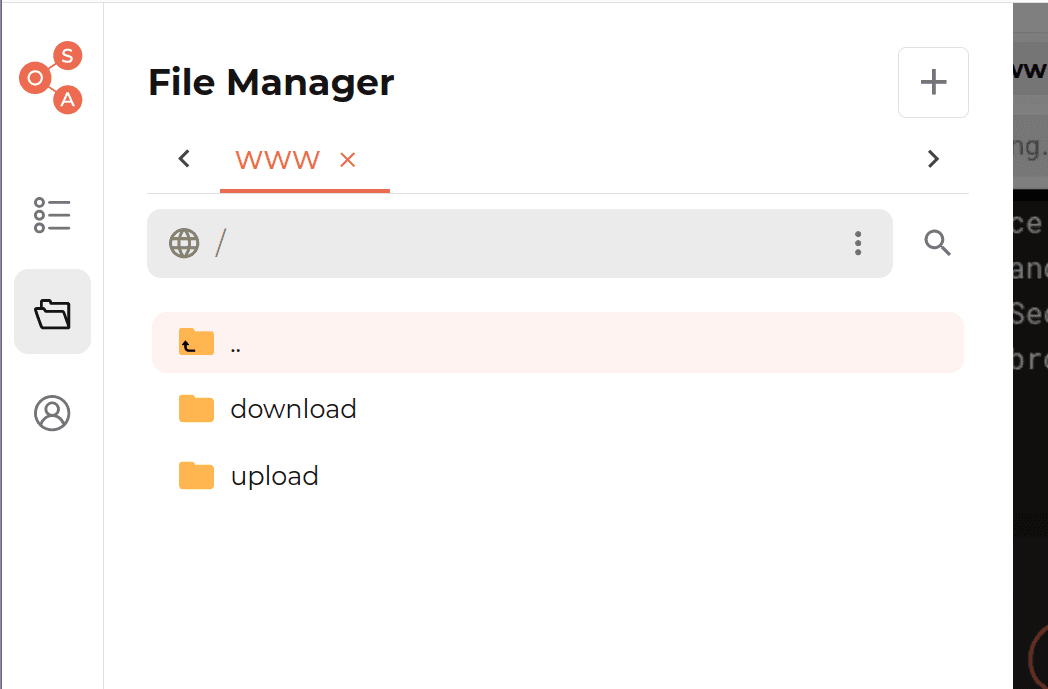
Since Browser Isolation is a completely isolated and virtualized environment, all file management goes through the File Manager, which sets up an exchange area made up of two folders:
- upload
- download
that you can freely use to upload/download files from the Browser Isolation session.
Shared Folders and Trusted Connections
If the administrator assigned you Shared Folders resources (network folders to mount on your computer) or Trusted Connections (services reachable through a local endpoint), the related icons appear in the sidebar. Both features require the Oplon Client app to be installed and running on your computer: its dedicated guide explains step by step how to mount a folder or start a connection. The (i) button next to the panel title lets you download Oplon Client for Windows, macOS and Linux.
In short:
- Shared Folders: click Mount on the desired folder, enter the credentials if asked and then the Security Code shown by Oplon Client, then Verify. Once the folder is mounted the green Connected chip appears: clicking it opens the folder on your computer, while the eject button unmounts it
- Trusted Connections: click Connect on the desired service and enter the Security Code shown by Oplon Client. The disconnect button closes the connection. The panel also offers a search bar and grouping by group and location
Multiple connection (Bulk): turning on the Bulk switch in the panel header lets you select several resources and connect them all together with Connect All, entering a single Security Code. For Shared Folders only folders with a single account and saved credentials can be selected. When it finishes, Bulk mode turns itself off.
In these panels too you can mark resources as favorites and see their information by clicking the row.
Settings
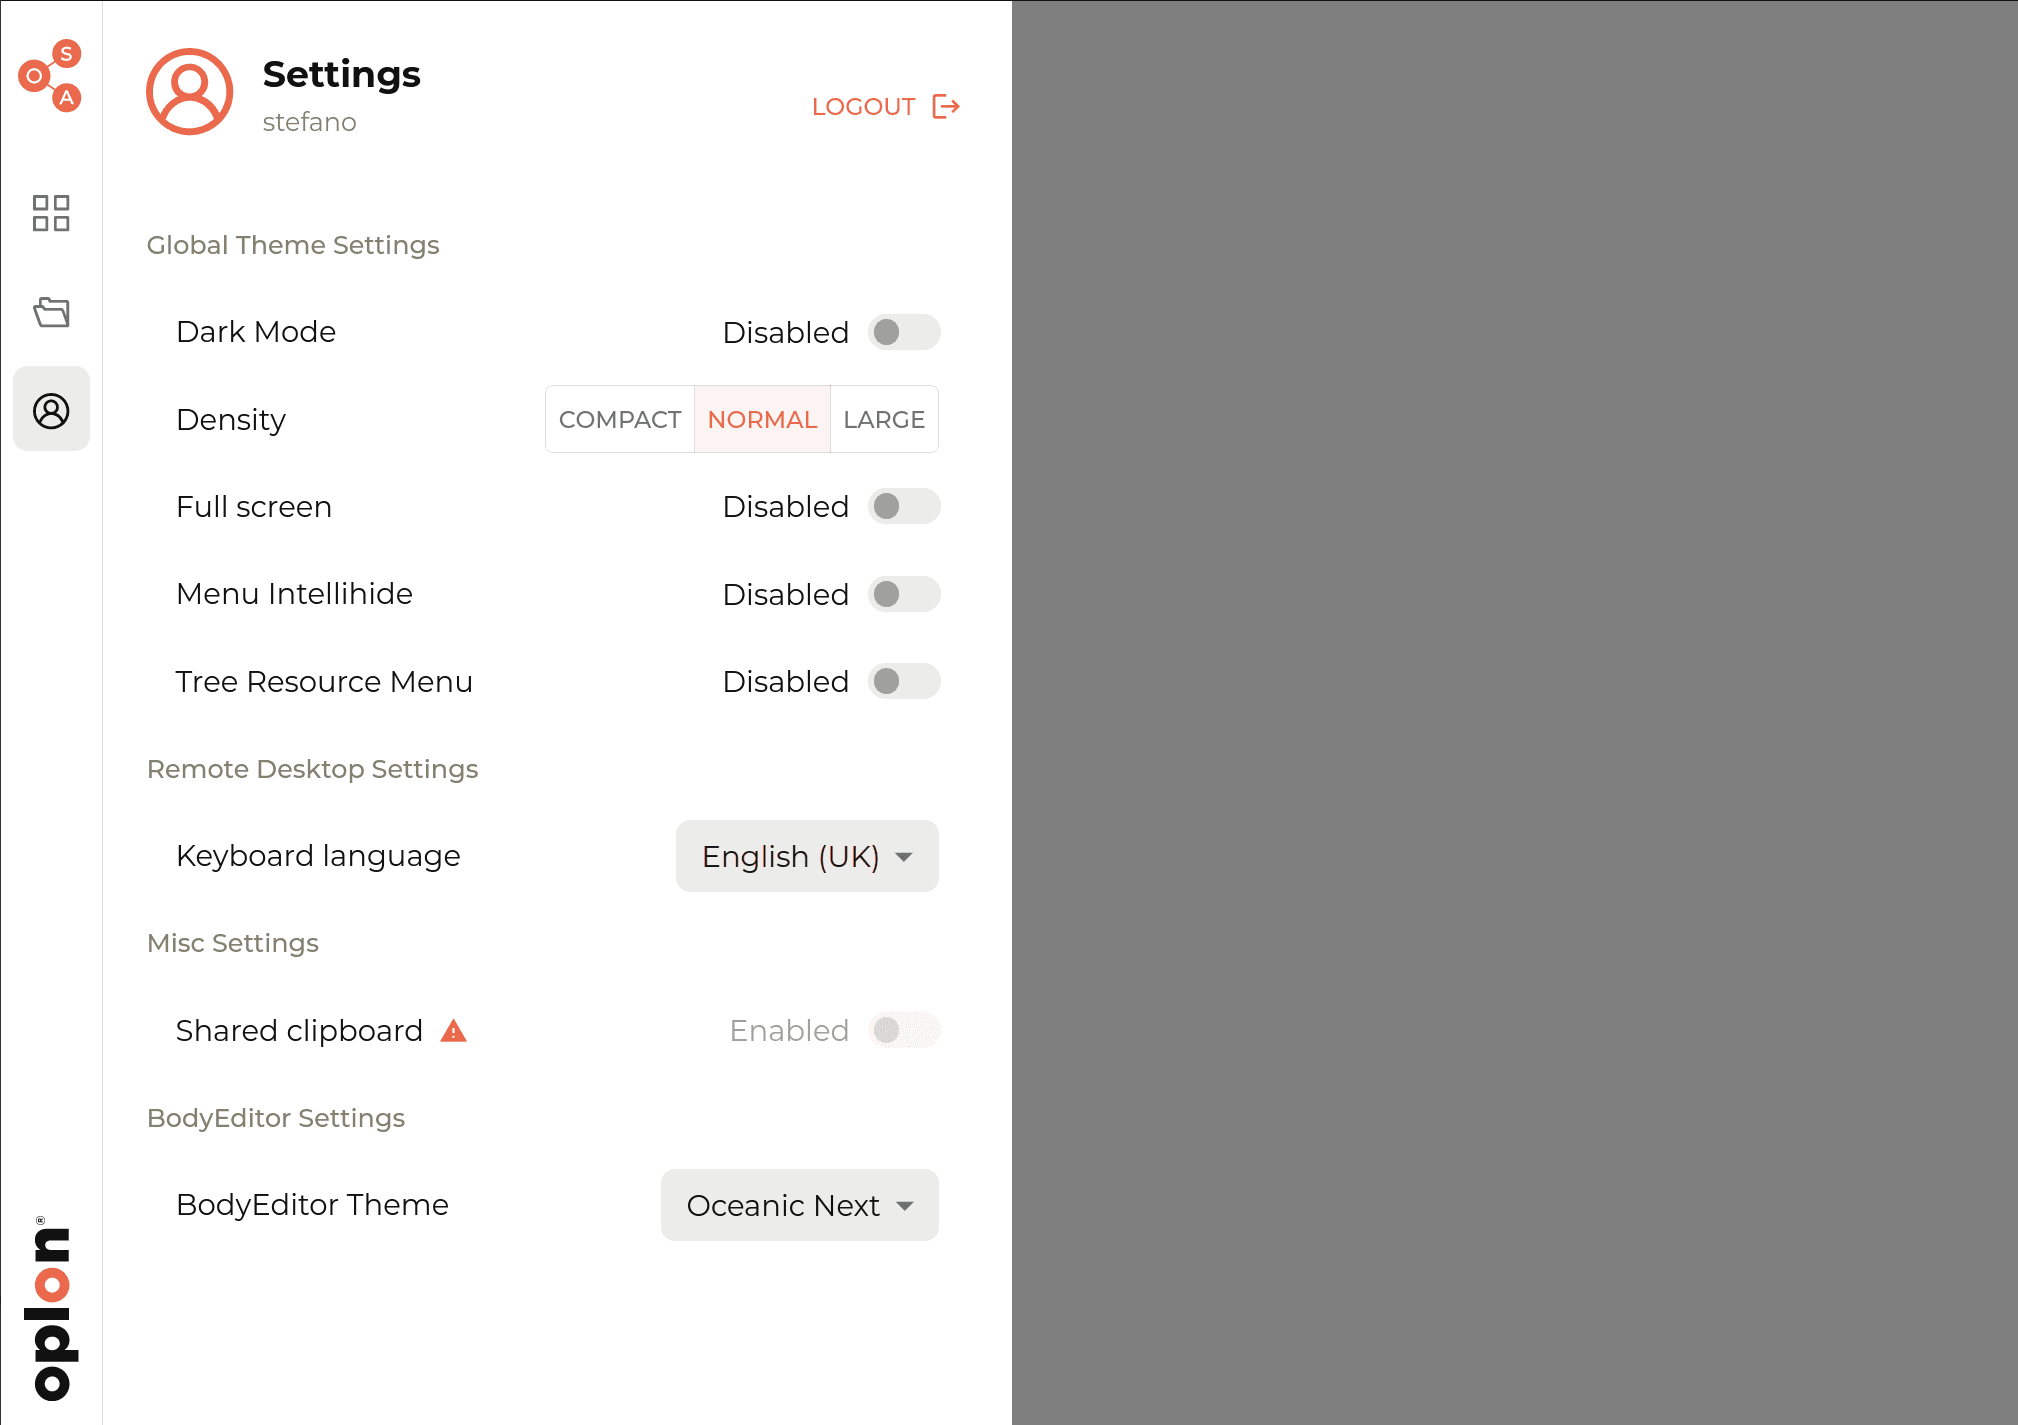
The features present are:
Global Theme Settings
- Dark Mode: change the OSA theme between DARK and LIGHT
- Density: change the window display mode between Compact, Normal and Large
- Full screen: enable/disable full screen/kiosk mode
- Menu Intellihide: hides the OSA sidebar, which reappears when you move the mouse to the same edge of the screen
- Tree Resource Menu: enable opening tree resources; when off, the grid view is used
Remote Desktop Settings
- Keyboard language: the keyboard layout used to send keystrokes to the remote session (remote desktop only). It should match the remote machine’s layout, otherwise some symbols may come out wrong (e.g. @ becoming ”). Applies to new connections; the default follows the browser language
- Display quality: default quality of the remote screen (Recommended, Compact, Standard)
Misc Settings
- Shared clipboard: setting that allows you to enable/disable reading the local clipboard. A warning icon shows if the browser does not support it or has not granted the permission
- Enable Touchscreen: enables touch input handling
- Touch Mode: default touch mode (Touchpad or Touchscreen, see Touch devices)
- OSK Mode, OSK Anchoring, OSK language: default mode, position and language of the on-screen keyboard (available languages: English, French, German, Italian, Spanish, Russian, Dutch)
File Manager Settings
- Show folders first: shows folders before files
- Visible columns: columns visible in the File Manager
Network Metrics
- Quality: shows the connection quality; see Network Metrics
At the bottom of the panel you find the logged-in user and their groups, together with the Logout button.
The text editor theme is chosen directly in the File Editor.
Network Metrics
OSA continuously measures the quality of the connection between your browser and the server. The metrics are calculated directly by the browser and represent the actual network conditions you experience: they help you understand whether slowdowns depend on the network, and are useful to share with support when troubleshooting.
In Settings, under Network Metrics, the Quality item shows a real-time preview of the connection quality as a colored chip. Hovering over it shows the current RTT and Jitter values.
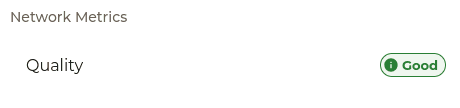
Clicking on the chip opens an interactive graph with the trend of the metrics over the last few minutes (about one sample every 5 seconds).
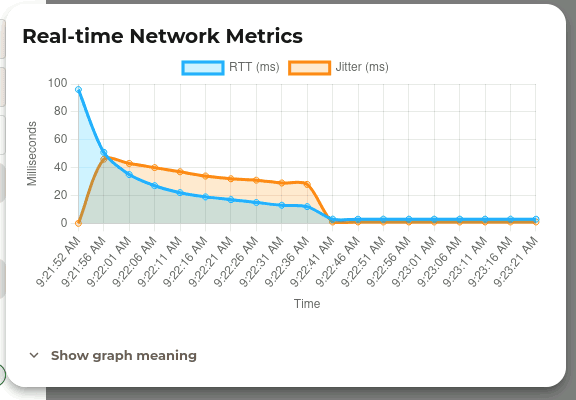
The data shown in the graph are:
- RTT (Round Trip Time): measures network latency, i.e. the time a request takes to travel from the browser to the server and back
- Jitter: measures how stable this latency is over time (connection stability)
Clicking on Show graph meaning opens a section describing the data with the relevant reference values.
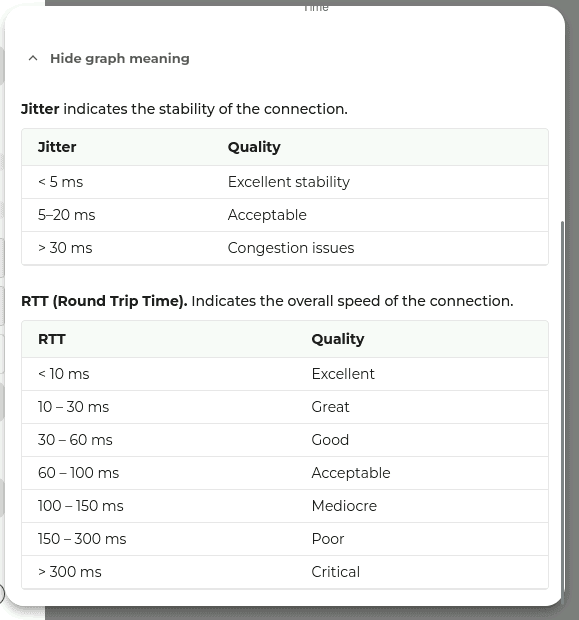
The rating shown in the chip depends on RTT:
| RTT | Quality |
|---|---|
| < 10 ms | Excellent |
| 10 – 30 ms | Great |
| 30 – 60 ms | Good |
| 60 – 100 ms | Acceptable |
| 100 – 150 ms | Mediocre |
| 150 – 300 ms | Poor |
| > 300 ms | Critical |
For Jitter, values below 5 ms mean a very stable connection, 5 to 20 ms is acceptable, above 30 ms indicates congestion issues.
About
Clicking the Oplon logo at the top of the sidebar opens the About screen, which shows the OSA version and the links to the licenses (OPLON LICENSES and THIRD PARTY LICENSES). It closes by clicking outside or pressing ESC.