File Integrity Monitoring
What is FIM
File Integrity Monitoring (FIM) is a tool that monitors files and alerts you to changes, such as file creation, modification, removal, and so on. Thanks to FIM, you are more likely to detect security breaches in a timely manner, ensuring a better chance of staying online and avoiding any major damage. For this reason, FIM is primarily considered a security solution. It is also useful for controlling file properties such as permissions, as even a simple change in a file’s permissions could leave the system open to attack.
Going into the module settings, you can create a series of filters indicating the directories within which to run FIM. In addition, you can include or exclude files and/or directories, indicate a time frame or time in which to run the module, etc.
Once you have given all the necessary information, by clicking the start button of the filter, FIM scans the entire hierarchical structure of the file systems starting from the directories indicated in the filter. For each file it encounters, FIM saves all the information about that file to an XML file, referred to below as the “database”, including its MD5. For directories, the same information as for files, except the MD5 and size, is saved in the same file.
When this processing is finished, the database signature is created and saved within it, using the SHA-512 algorithm. During the next run, FIM checks whether the database signature is correct:
- if it’s not correct, the contents of the database have changed;
- if it’s correct, the contents of the database have not changed.
In the first case, FIM only creates a new database with information about the files and directories of the new FIM run. In the second case, however, for each file and directory processed, each piece of its information is compared with the corresponding information saved in the database. If even one piece of information does not match, a file is created, referred to below as the “alert”, in which the differing information is saved, indicating the before (database information) and the after (information of the newly processed file).
Settings page
In the left side menu, select FIM > FIM settings to display the list of currently active FIM modules. The following are the attributes of the table displayed:
- Where: node name;
- What: module name;
- Tot. Enabled filters: number of active filters for that node.
Click the edit icon to access the FIM module view of that specific node.
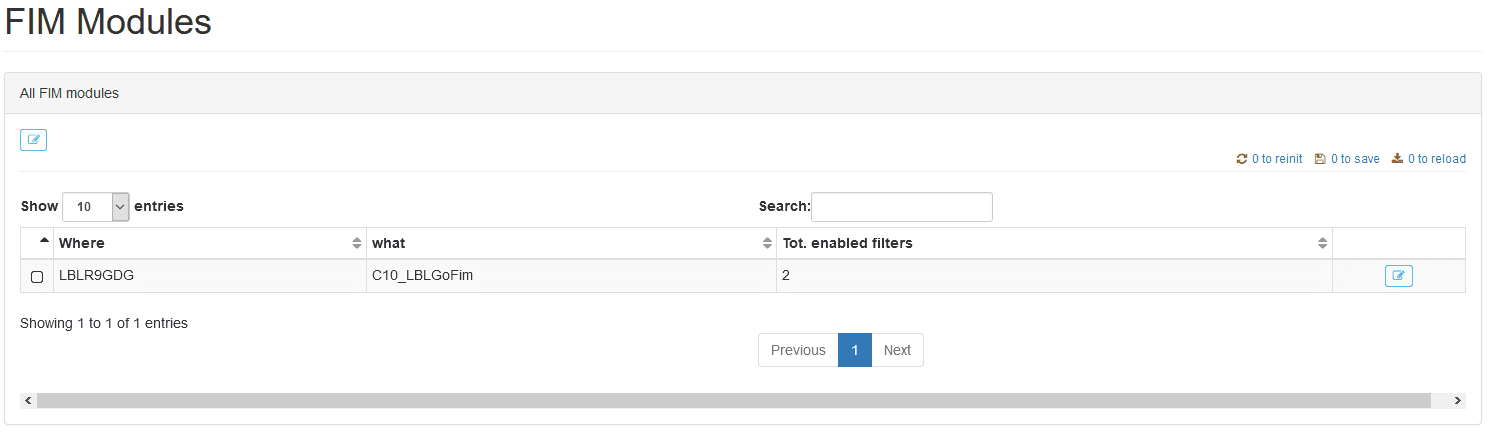
Figure 1: FIM Modules
Module page
This view shows 2 main panels:
- Basic parameters: contains the basic parameters of the module;
- Filter List: contains the list of filters with the basic information for each filter.
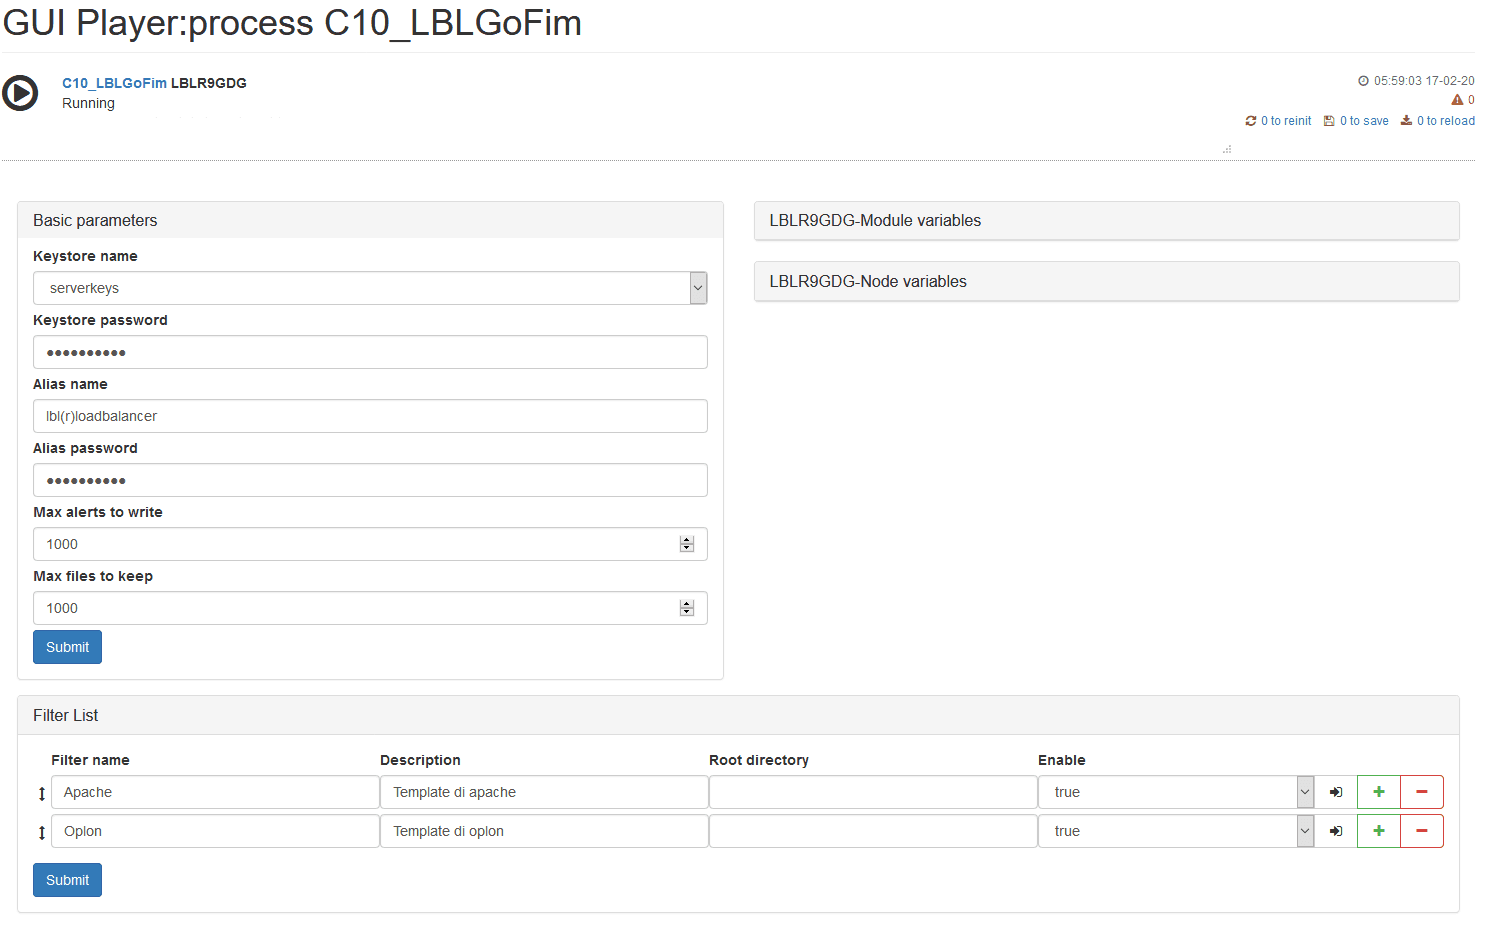
Figure 2: Module
Below are the parameters of the Basic parameters panel:
- Keystore name: name of the keystore that contains the digital certificate that is used to sign both alert files and database files;
- Keystore password: keystore password;
- Alias name: identifier name of the certificate within the keystore;
- Alias password: alias password;
- Max alerts to write: maximum number of alerts (files or directories whose information differs from that saved in the database) to be written to the alert file;
- Max files to keep: maximum number of alert files and database files to keep on disk.
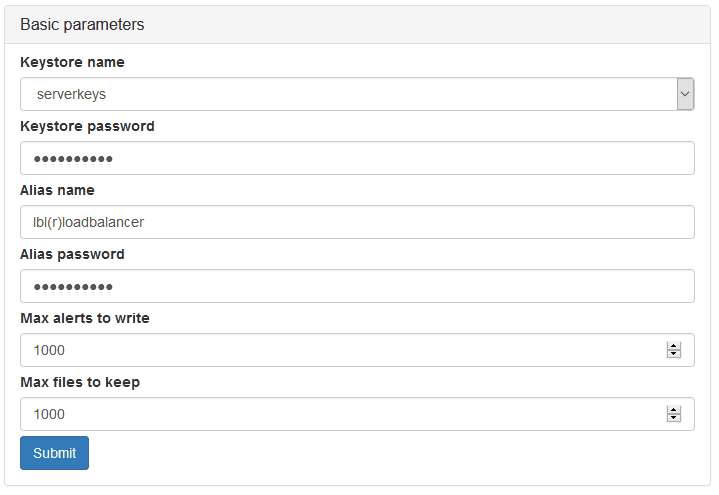
Figure 3: Basic Parameters
Below are the parameters of the Filter List panel:
- Filter name: filter name;
- Description: description of the filter;
- Root directory: main directory within which to run FIM; this directory is excluded from the check if you set at least one directory in the Directory List panel, which must be a directory inside the root directory;
- Enable: enables or disables the filter.
Click the See details icon in the Filter List panel to access the filter view.

Figure 4: Filter list
Filter page
This view shows 3 main panels:
- Filter: contains the filter settings in detail;
- Filter Conditions: contains generic rules for filtering directories and files;
- Directory List: contains all the directories associated with that filter within which to run FIM. So for each filter you can have a list of directories to monitor, which can have the same filtering conditions.
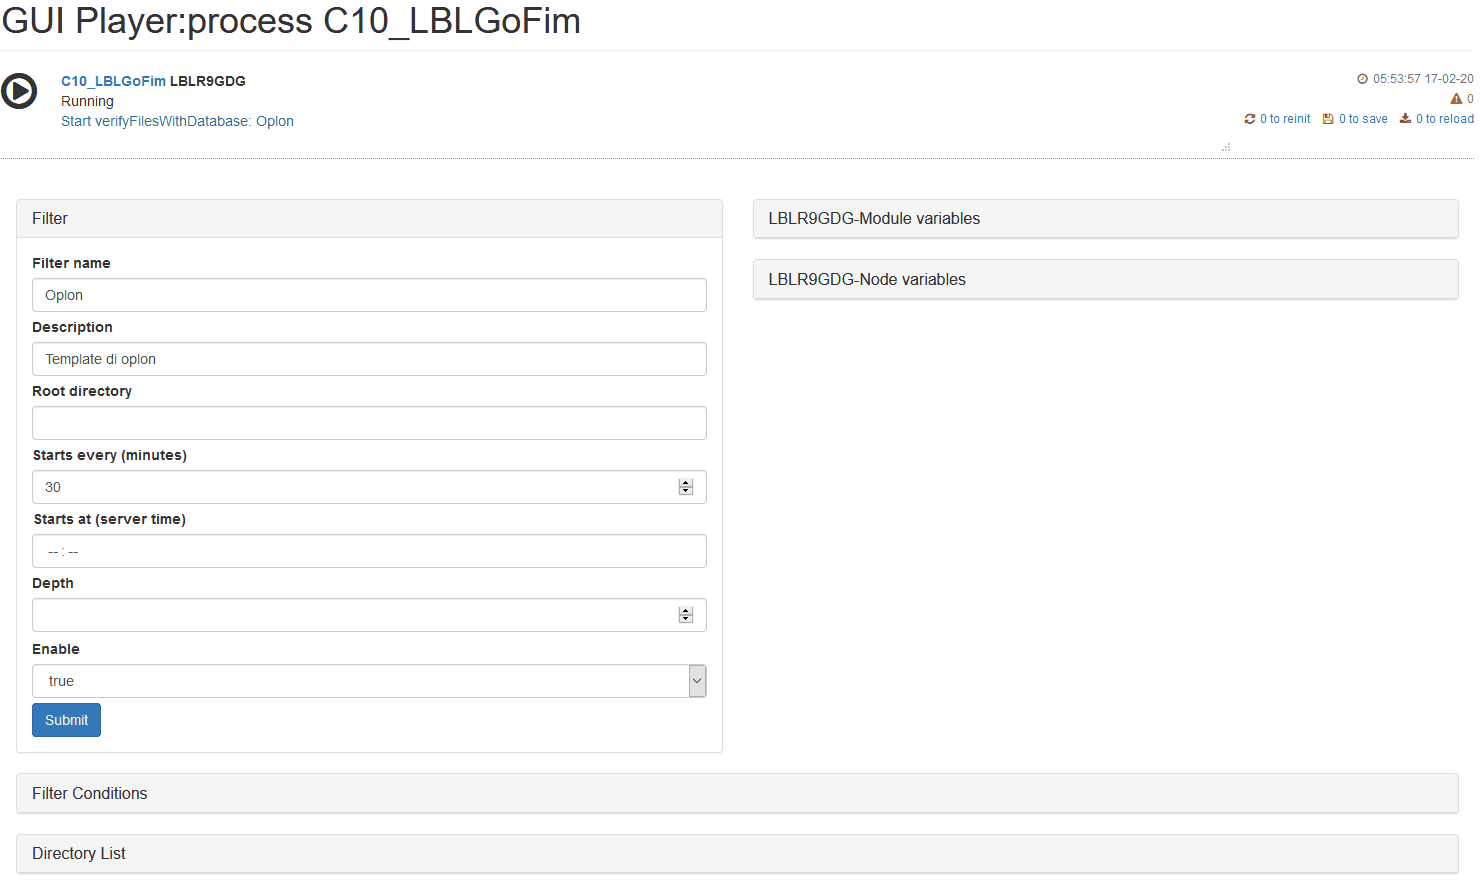
Figure 5: Filter Settings
Below are the parameters of the Filter panel:
- Filter name: filter name;
- Description: description of the filter;
- Root directory: main directory within which to run FIM; this directory is excluded from monitoring if you set at least one directory in the Directory List panel, which must be a directory inside the root directory;
- Starts every (minutes): indicates how often to run FIM, in minutes; if this field is not empty, Starts at (server time) is not taken into account;
- Starts at (server time): indicates the hour and minutes (in
hh:mmformat) at which FIM runs every day. If Starts every (minutes) is not empty, this field is not taken into account. Note: the time you enter is the time of the server where FIM is installed, which may be different from the local time; - Depth: indicates the depth of the file and directory monitoring; if
empty, the default value is
2147483647; - Enable: enables or disables the filter.
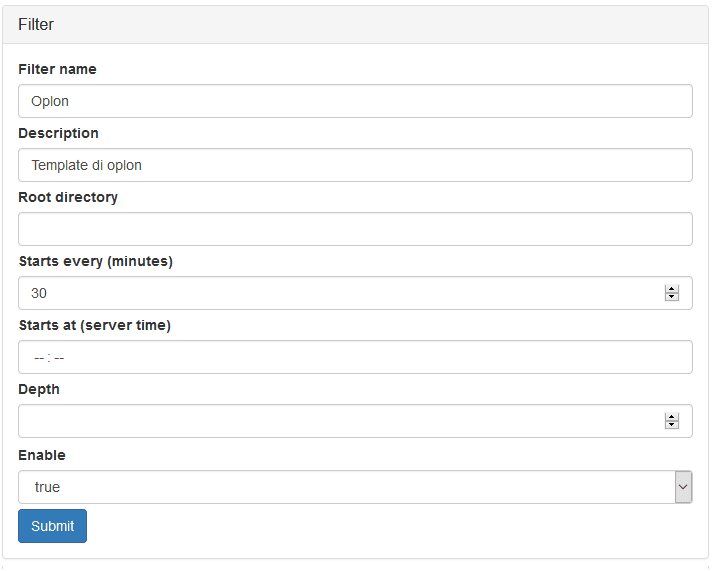
Figure 6: Filter panel
Below are the parameters of the Filter Conditions panel:
- Operation: list that includes two options:
- Include: includes files/directories. If Include is used, only files/directories that meet the rule parameters will be included in the monitoring, while all others will be skipped. Include has higher priority than Exclude, which means that if both are used for the same directory, Exclude is ignored;
- Exclude: excludes all files/directories. If Exclude is used, all files/directories that meet the rule parameters will be excluded from monitoring. Exclude has higher priority than Include, which means that if both are used for the same directory, Exclude is ignored;
- Type: list that includes two options:
- File: applies only to files;
- Directory: applies only to directories.
- Where: list that includes three options:
- Start: name of the file or directory that begins with …;
- End: name of the file or directory that ends with …;
- Regex: regular expression.
- Value: rule value.
For example, to exclude all files that end in .log, the rule will be:
Exclude -- File -- End - .log.
To include all files that end in .exe instead, the rule will be:
Include -- File -- End - .exe. However, this means that all files with
an extension other than .exe will be excluded.
If you want to add new rules, click the following button:
 If you want to delete rules, click the following button:


Figure 7: Filter Conditions panel
Below are the parameters of the Directory List panel:
- Directory name: name of the directory that you want to include in the monitoring;
- Description: directory description;
- Depth: indicates the depth of the monitoring of files and directories
within this directory; if empty, the default value is
2147483647; - Enable: enables or disables monitoring on this directory.

Figure 8: Directory List Panel
If you want to add new directories, click the following button:
If you want to delete directories, click the following button:
Click the See details icon in the Directory List panel to access the directory view.
Directory page
This view shows 2 main panels:
- Directory: shows the same information as the Directory List panel;
- Directory Conditions: contains generic rules for filtering directories and files. It has the same parameters as the Filter Conditions panel; the only difference is that the rules defined in this panel override those of the filter.
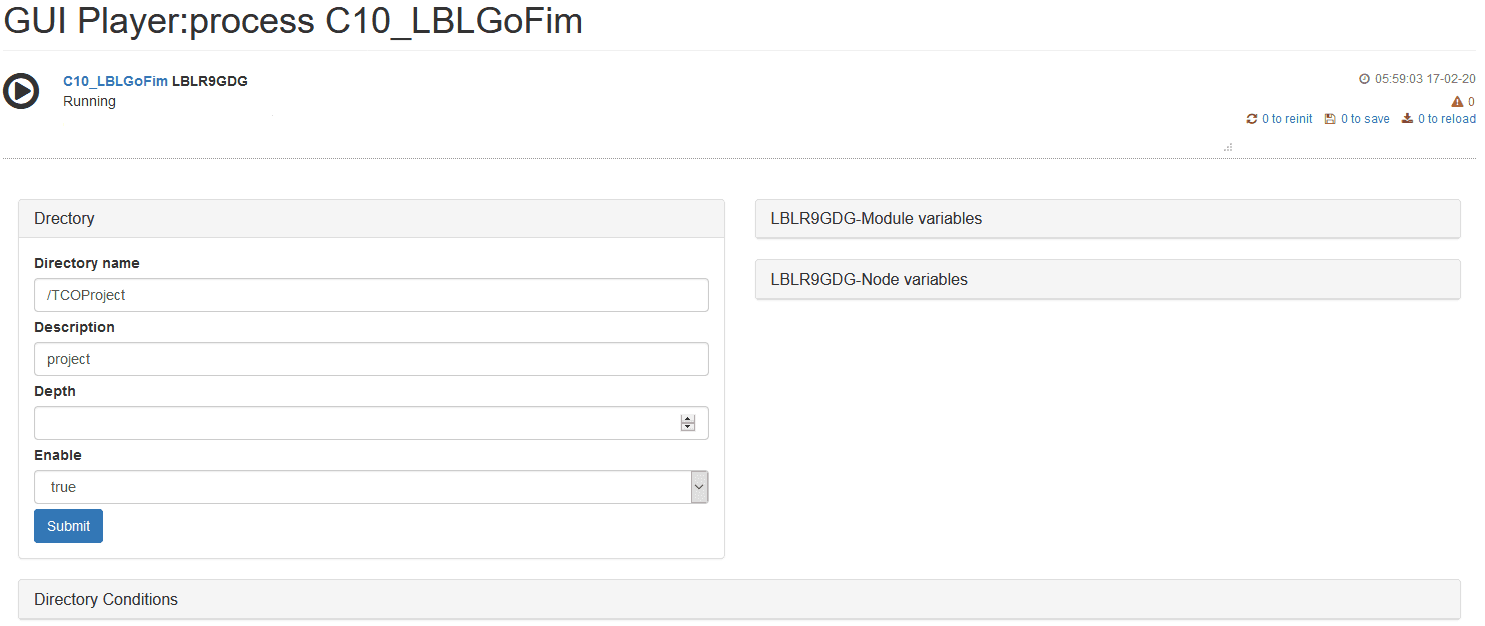
Figure 9: Directory settings
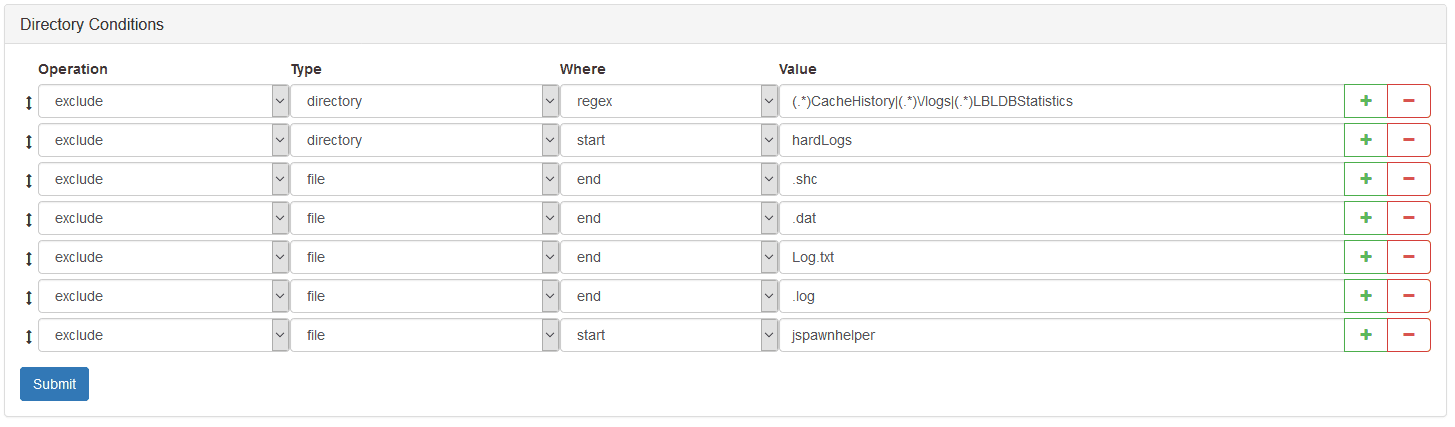
Figure 10: Directory Conditions Panel
NB: The directories in which databases and alerts are saved are:
- Linux:
/TCOProject/bin/LBL/LBLLoadBalancer_aai_010_000_000/procsProfiles/C10_LBLGoFim/notificationDir- Windows:
C:\TCOProject\bin\LBL\LBLLoadBalancer_aai_010_000_000\procsProfiles\C10_LBLGoFim\notificationDirWithin this path, the following directories are created automatically for
each filter:
.../<filterName>/databases and .../<filterName>/alerts.
Conditions
Below is a more detailed look at how Conditions work for directories.
| Operation | User input | User input norm. | Root + Directory | Directory | Directory norm. | Match |
|---|---|---|---|---|---|---|
| REGEX | (.*)/bb | /var | /var/aa/bbb | /aa/bbb/ | True | |
| STARTS | /aa/bb | /aa/bb | /var | /var/aa/bbb | /aa/bbb/ | True |
| /aa/bb/ | /aa/bb/ | /var | /var/aa/bbb | /aa/bbb/ | False | |
| aa/bb | /aa/bb | /var | /var/aa/bbb | /aa/bbb/ | True | |
| aa/bb/ | /aa/bb/ | /var | /var/aa/bbb | /aa/bbb/ | False | |
| ENDS | /aa/bb | /aa/bb/ | /var | /var/aaa/bb | /aaa/bb/ | False |
| /aa/bb/ | /aa/bb/ | /var | /var/aaa/bb | /aaa/bb/ | False | |
| aa/bb | aa/bb/ | /var | /var/aaa/bb | /aaa/bb/ | True | |
| aa/bb/ | aa/bb/ | /var | /var/aaa/bb | /aaa/bb/ | True |
Operation: indicates the condition that FIM should use to filter directories;
User input: indicates the Value field;
User input norm: indicates the normalized Value field (an operation that FIM performs during the search);
Root+Directory: indicates the concatenation of the RootDirectory
field with the FilterDirectory field, which FIM uses to normalize the
directories it filters;
Directory: indicates the directory that FIM found within Root+Directory;
Directory norm: indicates the directory that FIM found within Root+Directory, normalized (an operation that FIM performs during the search);
Match: indicates whether the normalized user input matches the normalized directory.
When FIM searches for files, it performs a series of operations to normalize the strings entered by the user as filter conditions.
-
To normalize the values of Starts, FIM checks whether the user input has a slash as its first character and, if not, adds it. Directory, instead, is normalized by removing Root+Directory from the path of the directory found and adding a slash as the last character.
-
To normalize the values of Ends, FIM checks whether the user input has a slash as its last character and, if not, adds it. Directory, instead, is normalized in the same way as for Starts.
-
To normalize the values of Regex, the user input is not changed, but Directory is normalized in the same way as for Starts.
NB: If the user enters the slash of the wrong operating system (\ or /), FIM
will not evaluate this condition correctly.
The user must enter the path of the directory to be excluded/included
starting from Root+Directory.
Status page
In the left side menu, select FIM > FIM Status to show the list of currently active filters, within a table.
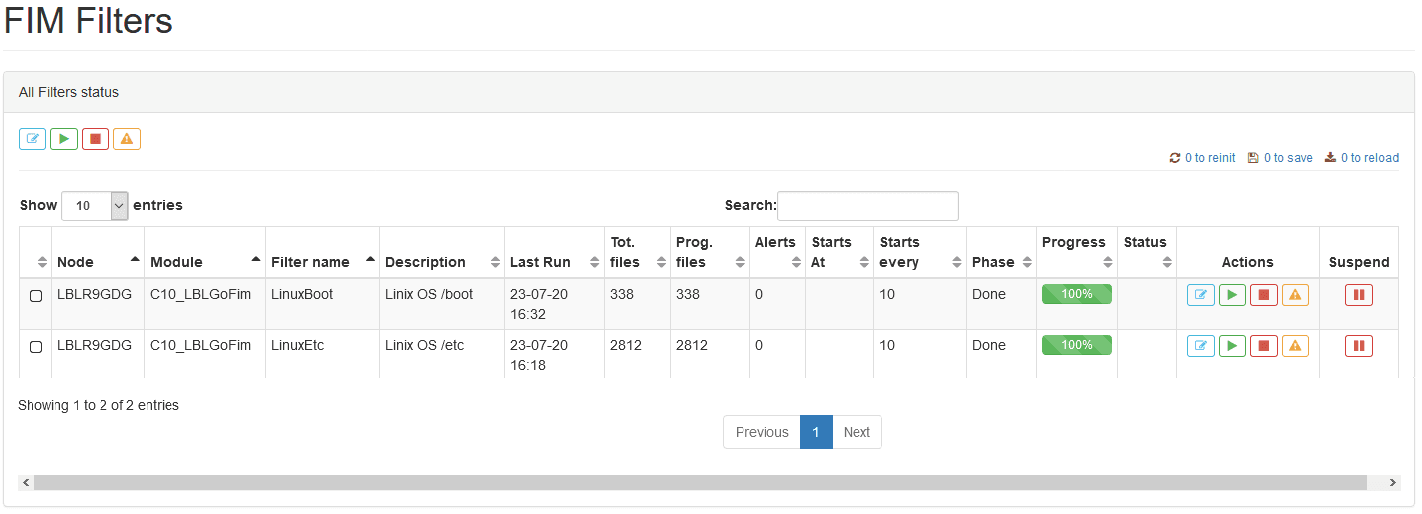
Figure 11: Status Page
The following are the attributes of the table displayed:
- Node: node name;
- Module: module name;
- Filter name: filter name;
- Description: description of the filter;
- Last Run: date and time of the last run;
- Prog. files: number of files currently verified;
- Tot. Files: total number of files to check;
- Alerts: number of files with issues detected;
- Starts at: indicates the hour and minutes (in
hh:mmformat) at which FIM runs every day. If Starts at and Starts every are not set, by default FIM runs at midnight every day; - Starts every: indicates how often to run FIM, in minutes;
- Phase: indicates the progress phase of processing;
- Progress: indicates the percentage of progress of the monitoring
run. The progress bar can be two colors:
- green if there are no alerts;

- orange if there are alerts;

- green if there are no alerts;
- Status: shows the status of the filter, which can be:
- Running:
 after clicking the start button in the Actions column, or
automatically based on the Starts at and Starts every values;
- Stopping:
 after clicking the stop button in the Actions column;
- Waiting:
 if a filter of the same node is already running.
- Running:
- Actions: set of buttons used to perform actions, which can be:
- Edit:
 redirects to the filter page in
Figure 5: Filter Settings;
- Start:
 starts monitoring;
- Stop:
 stops the running monitoring. If you stop it, the alerts created up to
that point (if any) may not be visible, depending on the monitoring
phase in which it is stopped;
- View Alert:
 redirects to the Alerts page in
Figure 12: Alerts List.
- Edit:
- Suspend:
 pauses, or
resumes the processing of alerts. If paused, alerts are not considered
during monitoring, and therefore new alerts (if any) are not displayed.
Alerts page
After clicking View Alert, you are redirected to a page that shows the alerts (if any) of the last run.
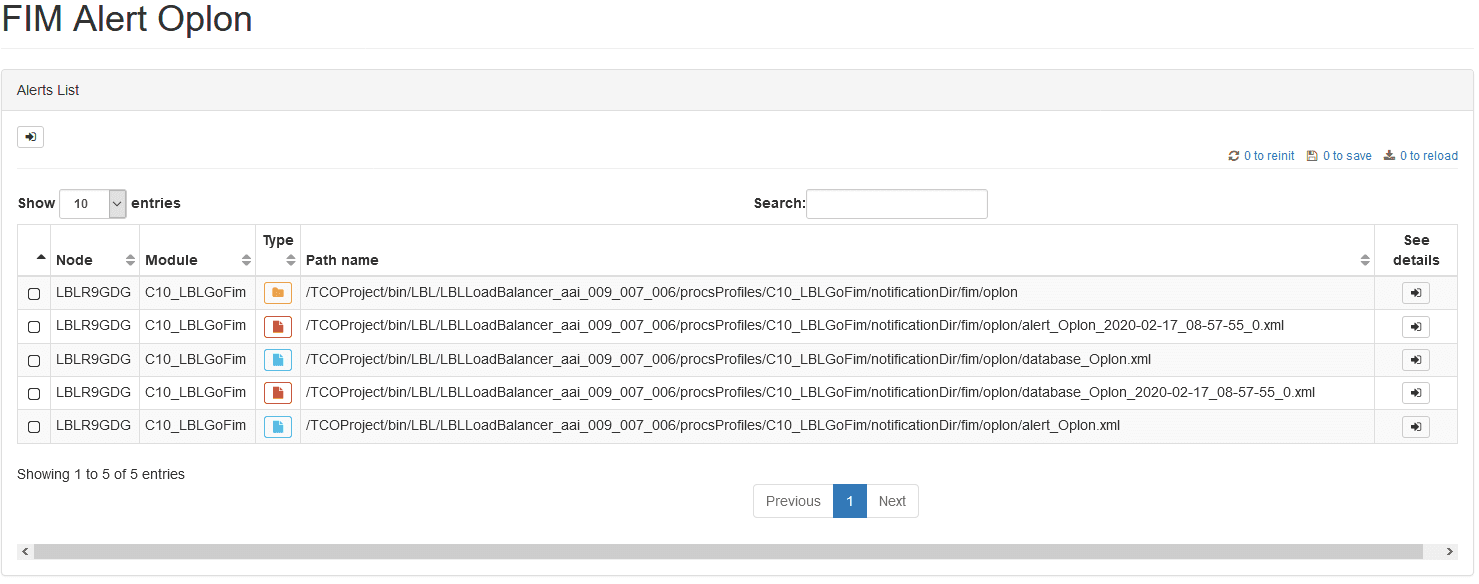
Figure 12: Alerts List
They appear as a table whose attributes are:
-
Node: node name;
-
Module: module name;
-
Type: indicates whether the alert shown is:
- File mismatch:
 that is, if the file has some
information different from the previous run;
- Directory mismatch:
 that is, if the directory has some
information different from the previous run;
- File new/old:
 that is, if the file is new or has
been moved or deleted;
- Directory new/old:
 that is, if the directory is new or
has been moved or deleted.
- File mismatch:
-
Path name: the path where an inconsistency was found;
-
See details: for each row of the table there is a button that, once clicked, only shows the information that has changed since the last run. You can view 5 types of alerts:
-
Mismatch: only shows the information that differs from the previous run;
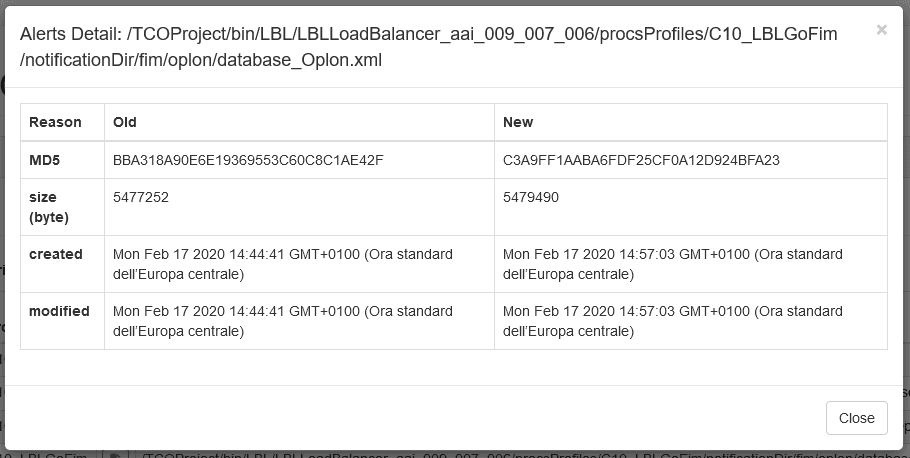
Figure 13: Modal Mismatch
-
Max alert exceed: only one alert is shown in the table when the number of alerts created exceeds the maximum limit set in the Max alerts to write parameter.
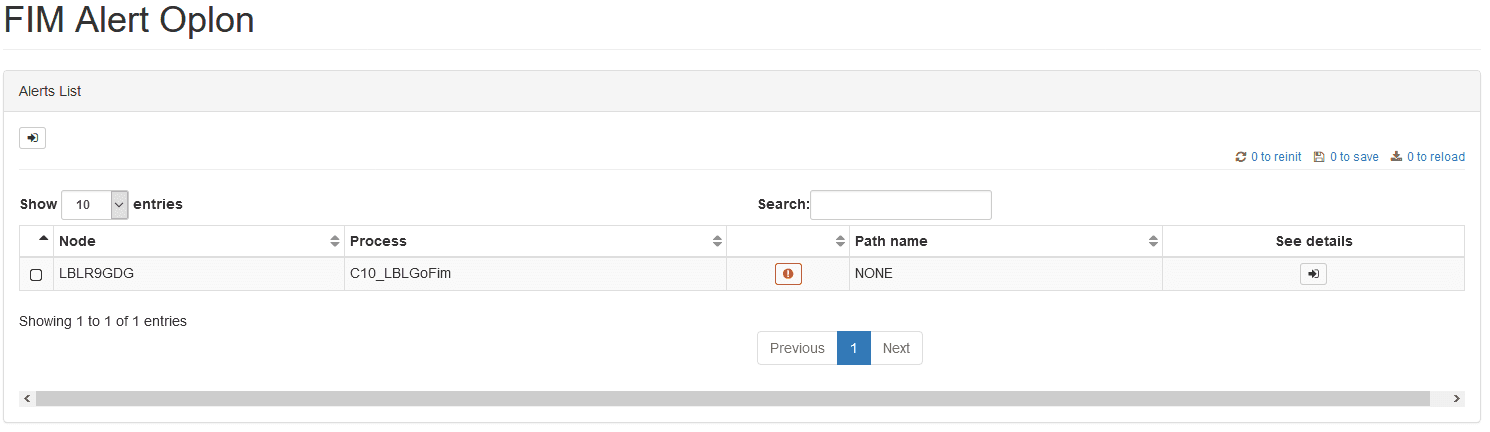
Figure 14: Max Alert Exceed Alert
If you click See details, the alert details are shown;
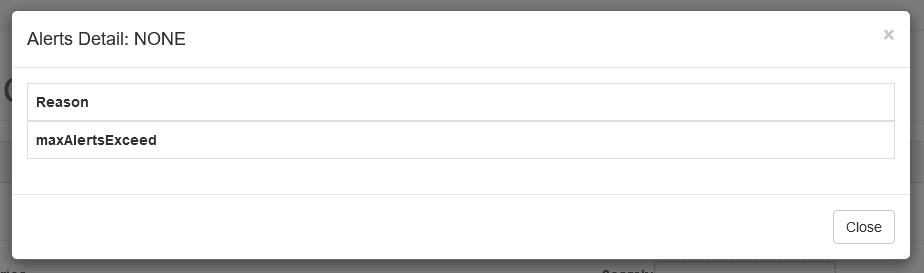
Figure 15: Modal Max Alert Exceed
-
New/old: shows all the information of the new or old file/directory, indicating whether it is new or old.
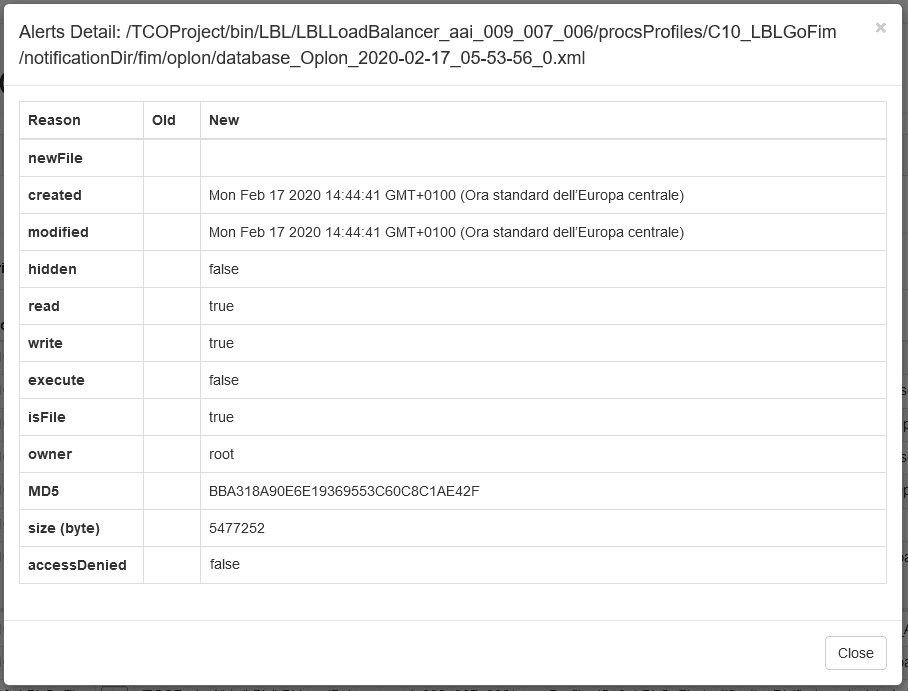
Figure 16: Modal New/Old
If you click See details, the alert details are shown;
-
Firm failed: the alert is shown in the table when a file signature is incorrect.

Figure 17: Firm failed
If you click See details, the alert details are shown.
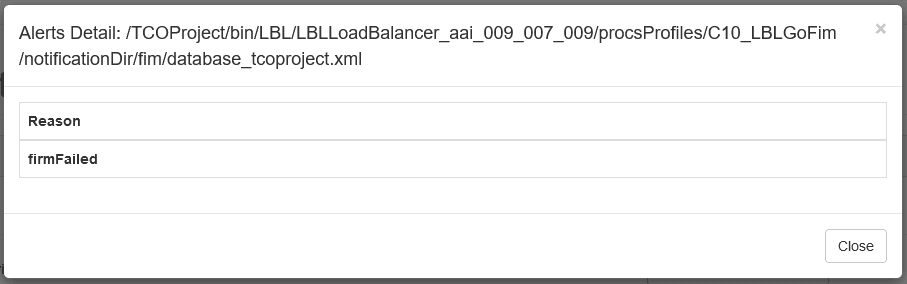
Figure 18: Modal firm failed
-
To view all the file or directory alerts contained in the parent directory of one of the paths in the list, just click the icon in the Type column for that path.
Example: with Path name A/B/C/file.txt, if you click the icon for
this file, the full path is written to the table search bar, excluding
file.txt, and then only the alerts of files and directories whose
Path name is A/B/C are shown.
Templates
The Filter List panel contains templates that can be modified to suit your needs.
The available templates are: Apache, MySQL, Tomcat, Nginx, Jboss.